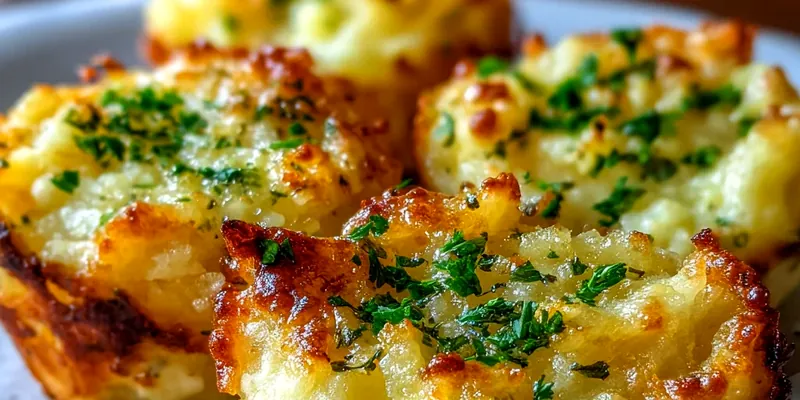
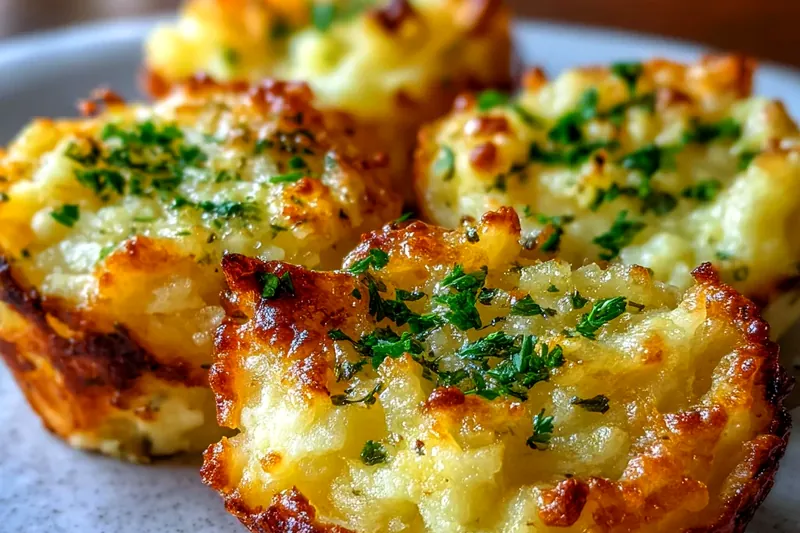
Stuffed Mashed Potato Nests with Cheese and Herbs
These elegant stuffed mashed potato nests combine the comfort of creamy mashed potatoes with the sophistication of a molded appetizer. Each golden, crispy cup holds a melted cheese center infused with fresh herbs, creating the perfect bite-sized indulgence.

Mastering the Perfect Potato Nest
The key to successful stuffed potato nests lies in achieving the right consistency for your mashed potato base. The mixture needs to be firm enough to hold its shape when molded, yet creamy enough to remain tender after baking. Using starchy potatoes like Yukon Gold provides the perfect balance of fluffiness and structure.
Temperature control is crucial throughout the process. Allow the mashed potatoes to cool to room temperature before shaping to prevent the egg from scrambling and to make handling easier. The addition of beaten egg acts as a binder, helping the nests maintain their shape while creating a golden, crispy exterior when baked.
💡 Professional Tip
For extra crispy edges, brush the formed nests with olive oil and place under the broiler for 2-3 minutes after baking.
Frequently Asked Questions
Yes, you can prepare the potato nests up to 24 hours ahead. Form the nests and add the filling, then cover and refrigerate. Add 5-10 minutes to the baking time when cooking from cold.
Absolutely! Gruyere, mozzarella, or goat cheese work wonderfully. Just ensure any cheese you use melts well and has good flavor. Avoid hard cheeses that don't melt smoothly.
Generously grease your muffin tin with butter or cooking spray. You can also dust with a light coating of flour after greasing for extra insurance against sticking.
The egg helps bind the potatoes and creates the golden color, but you can substitute with 2 tablespoons of cornstarch mixed with 3 tablespoons of milk for binding.
The nests are ready when the edges are golden brown and slightly crispy, and the cheese filling is bubbly and melted. They should feel firm to the touch and easily release from the muffin tin.
These work beautifully as appetizers with a simple green salad, or as a side dish alongside roasted meats, grilled chicken, or beef tenderloin. They pair well with cranberry sauce or herb aioli.
Yes! Try bacon bits, sautéed mushrooms, caramelized onions, or roasted vegetables. Just ensure any additions are cooked and well-drained to prevent soggy centers.
Store covered in the refrigerator for up to 3 days. Reheat in a 350°F oven for 10-12 minutes to restore crispiness. Avoid microwaving as it will make them soggy.
Recipe Troubleshooting Guide
Nests Falling Apart
Problem: The potato nests crumble or don't hold their shape during baking.
Solution: Ensure your mashed potatoes aren't too wet and that you've included the beaten egg for binding. Press the mixture firmly into the muffin cups and make sure it's cooled to room temperature before baking.
Soggy Bottoms
Problem: The bottom of the nests are soggy instead of crispy.
Solution: Make sure your muffin tin is properly preheated and well-greased. Avoid overfilling with wet ingredients and ensure the oven temperature is accurate using an oven thermometer.
Filling Leaking Out
Problem: The cheese filling spills over the sides during baking.
Prevention: Don't overfill the nests - leave about 1/4 inch from the top. Make sure the potato walls are thick enough and pressed firmly to contain the filling.
Uneven Browning
Problem: Some nests brown faster than others in the same batch.
Recovery: Rotate the muffin tin halfway through baking and ensure all nests are shaped uniformly. Check that your oven heats evenly and consider using the center rack.
Difficulty Removing from Pan
Problem: The nests stick to the muffin tin and break when removing.
Prevention: Let them cool for 5-10 minutes before attempting to remove. Run a thin knife around the edges and use a spoon to gently lift them out. Ensure adequate greasing next time.
Flavor Balance
Too Sweet: Add a pinch of salt or a squeeze of lemon juice to balance sweetness from the potatoes.
Too Salty: Serve with a dollop of sour cream or unsalted butter to mellow the saltiness.
Bland: Increase the seasoning in both the potato base and filling. Add garlic powder, onion powder, or fresh herbs for more flavor depth.
Selecting the Best Ingredients
The foundation of exceptional stuffed potato nests starts with choosing the right potatoes. Yukon Gold potatoes are ideal because they have a naturally creamy texture and moderate starch content that creates fluffy mashed potatoes without becoming gluey. Avoid waxy potatoes like red potatoes, which won't mash as smoothly.
For the cheese filling, use a combination of sharp cheddar for flavor and cream cheese for smooth meltability. Fresh herbs make a significant difference in taste - dried herbs can be substituted but use half the amount. Room temperature ingredients blend more easily and create a smoother, more cohesive filling.
Essential Ingredient Notes
- Yukon Gold Potatoes: Choose potatoes that are firm, smooth-skinned, and free of green spots or sprouts for the best flavor and texture.
- Sharp Cheddar Cheese: Grate your own cheese from a block rather than using pre-shredded for better melting and superior flavor.
- Fresh Herbs: Choose bright green herbs without wilted or dark spots. Chop just before using to maintain maximum flavor and color.

Professional Shaping Techniques
Proper shaping technique is essential for creating potato nests that are both beautiful and functional. Start by dividing the cooled mashed potato mixture evenly among the muffin cups using a large spoon or ice cream scoop. Press the mixture firmly against the bottom and sides, creating walls about 1/2 inch thick.
Use the back of a spoon or your thumb to create a well in the center of each nest, making sure the walls are high enough to contain the filling. The key is to work quickly while the potato mixture is still pliable but cool enough to handle. Consistent shaping ensures even cooking and professional presentation.
Creating Perfect Wells
To create uniform wells, use a rounded tablespoon or small ladle to press into the center of each portion while simultaneously pressing the mixture up the sides of the muffin cup. This dual motion creates the classic nest shape with adequate depth for filling.
Stuffed Mashed Potato Nests with Cheese and Herbs
📋 Ingredients
Base Ingredients
- 1 cup shredded sharp cheddar cheeseGrate from block for better melting
- 1/4 cup cream cheese, softenedEnsures smooth, creamy texture
- 2 tablespoons fresh chives, choppedAdds mild onion flavor and color
- 1 tablespoon fresh parsley, mincedBrightens the overall flavor
- 1/2 teaspoon garlic powderAdds savory depth without chunks
Filling Ingredients
- 2 lbs Yukon Gold potatoes, peeled and cubedPerfect starch content for creamy mashing
- 4 tablespoons butter, softenedAdds richness and helps with texture
- 1/2 cup whole milk, warmedWarm milk incorporates better than cold
- 1 large egg, beatenActs as binder and creates golden color
- 1/2 cup grated Parmesan cheeseAdds umami and helps with browning
- 1 teaspoon saltSeason to taste, potatoes need adequate salt
- 1/2 teaspoon black pepperFreshly ground preferred for best flavor
- 2 tablespoons olive oil for brushingCreates crispy, golden exterior
Instructions
Step 1
Preheat oven to 400°F. Boil cubed potatoes in salted water for 15-18 minutes until fork-tender. Drain thoroughly and let cool for 5 minutes.
Step 2
Mash potatoes with butter, warm milk, beaten egg, Parmesan cheese, salt, and pepper until smooth and creamy. Let mixture cool to room temperature.
Step 3
Meanwhile, combine cheddar cheese, cream cheese, chives, parsley, and garlic powder in a bowl. Mix until well combined for the filling.
Step 4
Grease 8 muffin cups generously. Divide mashed potato mixture evenly among cups, pressing up sides to form nest shapes with wells in the center.
Step 5
Fill each potato nest with 2-3 tablespoons of cheese mixture. Brush tops with olive oil for extra crispiness.
Step 6
Bake for 20-25 minutes until edges are golden brown and filling is bubbly. Cool for 5 minutes before carefully removing from muffin tin.
Recipe Notes & Tips
Storage
Store covered in refrigerator for up to 3 days. Reheat in 350°F oven for 10-12 minutes to restore crispiness. Can be frozen for up to 1 month.
Serving Suggestions
Serve as appetizers with sour cream or herb aioli, or as a side dish with roasted meats. Garnish with additional fresh herbs or crispy bacon bits.
Variations
Try different cheese combinations like Gruyere and Swiss, or add cooked bacon, sautéed mushrooms, or roasted vegetables to the filling for variety.