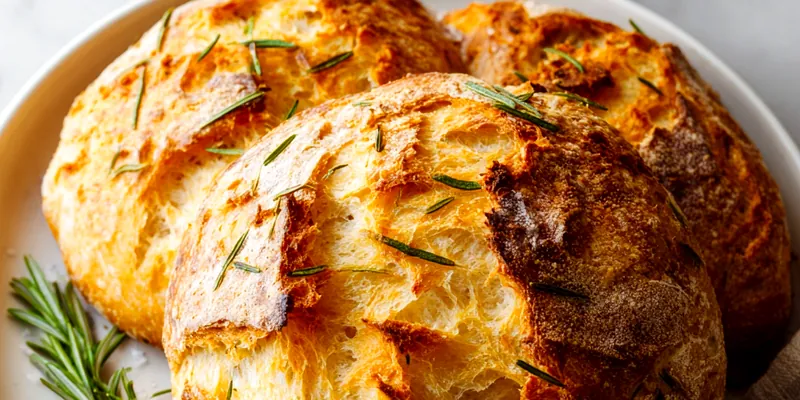
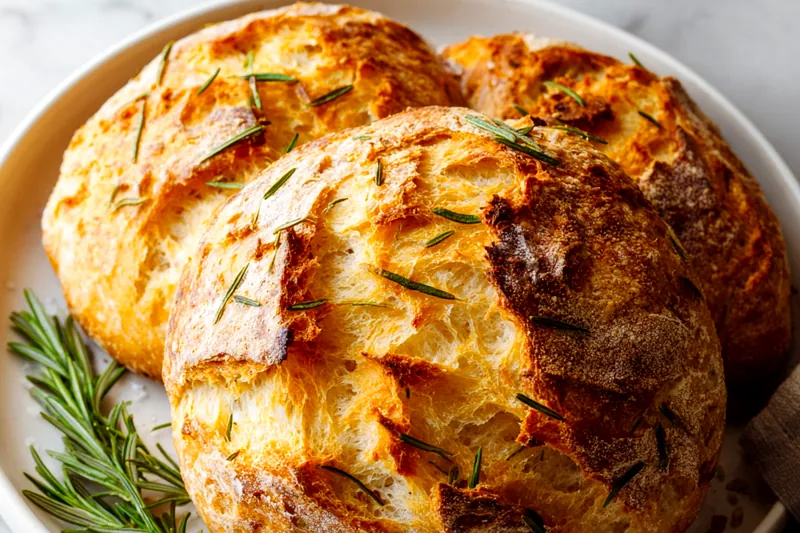
Rosemary Garlic No-Knead Artisan Bread
This rosemary garlic no-knead bread transforms simple pantry ingredients into a stunning artisan loaf with a crackly golden crust and tender, hole-studded crumb. The secret is time—a long, slow fermentation that requires zero kneading but delivers maximum flavor. Fresh rosemary and roasted garlic notes perfume every slice, making this the perfect companion to soups, pasta, or simply slathered with butter.

Why This No-Knead Method Works
Traditional bread recipes require extensive kneading to develop gluten structure, but this no-knead method uses time instead of muscle. The long fermentation period allows gluten strands to form naturally through enzymatic action and gentle folding. This creates an open, airy crumb structure with those beautiful irregular holes you see in artisan bakery loaves. The minimal handling also means less risk of overworking the dough, which can lead to tough, dense bread.
The Dutch oven technique is the secret weapon for achieving bakery-quality crust at home. When you preheat the covered pot, it creates a mini steam oven that traps moisture during the first half of baking. This steam keeps the crust soft initially, allowing maximum oven spring as the bread rises dramatically. Once you remove the lid, the dry heat creates that signature crackly, deeply caramelized crust that shatters perfectly with each bite. The combination of high heat and steam is what professional bakers use, and this method brings it right to your home kitchen.
💡 Professional Tip
Always let your bread cool completely before slicing—at least one full hour. Cutting into hot bread releases steam that's still cooking the interior crumb, resulting in a gummy texture. Patience here makes all the difference between good bread and spectacular bread.
Frequently Asked Questions
Absolutely! The beauty of this recipe is its flexibility. After mixing the dough, you can refrigerate it for up to 3 days before shaping and baking. Cold fermentation actually enhances flavor development. Just let the cold dough sit at room temperature for 30 minutes before shaping. You can also bake the bread, let it cool completely, and store it wrapped in a kitchen towel for 2-3 days, or freeze for up to 3 months.
Yes, but use only 1 tablespoon of dried rosemary since it's more concentrated in flavor. Fresh rosemary provides a brighter, more aromatic quality that really shines in this bread, but dried works well in a pinch. If using dried, crush it between your fingers before adding to release the essential oils. You can also substitute other herbs like thyme, oregano, or a blend of Italian herbs.
You can use any heavy oven-safe pot with a tight-fitting lid, such as an enameled cast iron pot, a ceramic baker with lid, or even a large oven-safe pot with an oven-safe plate as a lid. The key is that it needs to withstand 450°F and trap steam. Alternatively, you can bake on a baking stone or sheet pan and create steam by placing a pan of water on the bottom oven rack, though results won't be quite as dramatic.
This dough is supposed to be very wet and sticky—that's what creates the open crumb structure and tender texture. Resist the urge to add extra flour during mixing. When shaping, use plenty of flour on your hands and work surface, and handle the dough gently and quickly. The high hydration is what gives this bread its signature artisan quality, so embrace the stickiness!
The bread is done when it's deep golden brown all over and sounds hollow when you tap the bottom. For precision, use an instant-read thermometer—the internal temperature should reach 205-210°F. The crust should be deeply caramelized and crispy. If you're unsure, it's better to bake a few minutes longer than to underbake, as a well-baked crust protects the bread and enhances flavor through caramelization.
This rosemary garlic bread pairs beautifully with Italian soups like minestrone or tomato basil, alongside pasta dishes with marinara or olive oil-based sauces, or as part of a charcuterie board with aged cheeses and cured meats. It's also spectacular toasted and rubbed with fresh garlic, then drizzled with olive oil for authentic bruschetta. The herb flavors complement Mediterranean dishes particularly well, and it makes incredible sandwiches or panini.
Definitely! Add 1 cup of shredded Parmesan, aged cheddar, or Gruyère cheese to the dough along with the herbs. Fold it in gently after the initial rise for best distribution. You can also sprinkle cheese on top before the final bake. Just be aware that cheese can make the crust slightly softer and may cause some darker spots, but the flavor is absolutely delicious. Asiago and Romano cheeses work particularly well with the rosemary and garlic.
Store cooled bread at room temperature wrapped in a clean kitchen towel or in a paper bag for 2-3 days. Avoid plastic bags as they make the crust soft and chewy. For longer storage, slice the bread and freeze in a freezer bag for up to 3 months. Toast slices directly from frozen, or thaw at room temperature. To refresh day-old bread, spritz lightly with water and warm in a 350°F oven for 5-10 minutes to re-crisp the crust.
Recipe Troubleshooting Guide
Dough Didn't Rise
Problem: After 12-18 hours, the dough hasn't doubled in size or looks flat with no bubbles on the surface.
Solution: This usually means the yeast was inactive or the room was too cold. Check your yeast expiration date and proof it first by mixing with warm water and a pinch of sugar—it should foam in 10 minutes. Keep dough in a warm spot (70-75°F) like near a warm oven or on top of the refrigerator. If your kitchen is very cold, the rise may take 20-24 hours, which is fine and will deepen the flavor.
Crust Too Thick or Hard
Problem: The crust came out extremely thick, hard to bite through, or overly dark and burnt.
Solution: Reduce oven temperature to 425°F if your oven runs hot. Make sure you're removing the lid after 30 minutes—leaving it on too long creates excess crust. Also check that you're not overbaking in the uncovered stage; watch for deep golden color rather than dark brown. If the crust is perfect but cools to being too hard, your kitchen may be very dry—store bread wrapped in a towel to retain some moisture.
Dense, Gummy Interior
Problem: The bread has a tight, dense crumb without open holes, or the center is gummy and undercooked.
Prevention: This indicates underbaking. Always check internal temperature (should be 205-210°F) rather than relying on time alone. The bread needs that extra uncovered baking time to fully set the crumb structure. Also ensure your oven is fully preheated—use an oven thermometer to verify temperature. Finally, resist cutting into hot bread; the carryover heat and steam need time to finish setting the interior crumb structure.
Bread Stuck to Dutch Oven
Problem: The bread adhered to the pot bottom and tore when trying to remove it.
Recovery: Always use parchment paper under the dough before placing it in the Dutch oven—this creates a lifting sling and prevents sticking entirely. If you forgot the parchment, make sure the pot is scorching hot before adding dough, as the immediate sear creates a barrier. You can also lightly oil the bottom of the pot, though this may create a slightly different crust texture. Use the parchment paper overhang to easily lift the finished loaf out.
Flat Loaf, No Oven Spring
Problem: The bread didn't rise much during baking and came out flat or pancake-like instead of domed.
Prevention: Oven spring requires three things: adequate gluten development from the long rise, enough steam in the first half of baking, and a properly preheated Dutch oven. Make sure you're allowing the full 12-18 hour first rise so gluten develops. Don't skip the 30-minute Dutch oven preheat—it must be blazing hot. Also, work quickly when shaping to maintain dough temperature, and don't overhandle or deflate the dough excessively. A gentle touch preserves the gas bubbles that create lift.
Flavor Balance Issues
Too Sweet: If the bread tastes oddly sweet, you may have used too much yeast or sugar (this recipe intentionally uses minimal yeast). Reduce yeast to 1/8 teaspoon for a slower, more complex fermentation.
Too Salty: If too salty, reduce salt to 1¼ teaspoons, especially if using fine table salt instead of coarse kosher salt, which measures differently. Also check your water—heavily softened or mineral-rich water can affect salt perception.
Bland: If the bread lacks flavor, ensure you're using the full 12-18 hour fermentation time—this is where complex flavors develop. Also verify your rosemary is fresh and aromatic (old dried herbs lose potency), and consider roasting the garlic before adding for deeper flavor.

Choosing the Best Ingredients for Artisan Bread
Flour selection significantly impacts your bread's texture and flavor. All-purpose flour works beautifully and creates a tender crumb, while bread flour produces a chewier texture with slightly more structure due to higher protein content. Either choice yields excellent results, so use what you have on hand. Avoid self-rising flour or cake flour, as these have different protein levels and leavening agents that won't work with this recipe. For the best flavor, seek out unbleached flour, which retains more of the wheat's natural taste.
Fresh rosemary makes a remarkable difference in this bread. Look for vibrant green sprigs with firm needles that release a piney, resinous aroma when rubbed. Avoid brown, dried-out rosemary that's lost its essential oils. For the garlic, fresh cloves minced just before mixing provide the brightest, most aromatic flavor. Pre-minced jarred garlic works in a pinch but lacks the punch of fresh. The olive oil should be good quality but doesn't need to be your finest extra virgin—save that for drizzling on the finished bread where its nuances shine through.
Essential Ingredient Notes
- Yeast: This recipe uses very little yeast—just ¼ teaspoon for the entire loaf. This minimal amount combined with long fermentation creates complex flavor without that overly yeasty taste. Active dry yeast and instant yeast both work; if using instant, you can skip dissolving it in water and add directly to flour. Always check the expiration date, as old yeast won't provide adequate rise.
- Water Temperature: Water should be warm to the touch but not hot—around 110°F is ideal. Too hot (above 120°F) will kill the yeast, while too cold slows fermentation significantly. Test by dipping your finger in; it should feel like a comfortable bath. Room temperature water works too, though fermentation will take a few hours longer. Filtered or spring water is best if your tap water is heavily chlorinated.
- Salt: Use kosher salt or sea salt for best results and easier measurement. If using fine table salt, reduce to 1¼ teaspoons as it's more concentrated by volume. Salt strengthens gluten structure, controls yeast fermentation rate, and dramatically enhances flavor. Don't skip or reduce it—bread without adequate salt tastes flat and bland. For the topping, coarse sea salt or flaky salt like Maldon provides beautiful texture and bursts of salinity.
Mastering the No-Knead Technique
The magic of no-knead bread lies in understanding how gluten develops. Traditional kneading mechanically aligns gluten strands through force, but time accomplishes the same result through enzymatic activity. As the dough rests, flour proteins slowly hydrate and naturally form strong gluten networks. The wet, sticky consistency is essential—high hydration allows flour particles to move freely and connect. This is why we don't add extra flour even though the dough seems impossibly wet. That wetness creates the open, irregular crumb structure characteristic of rustic artisan breads.
The Dutch oven technique replicates a professional steam-injected oven. When you place wet dough into the preheated pot and cover it, the moisture from the dough instantly creates steam in the enclosed space. This steam keeps the outer crust soft during the first 30 minutes, allowing maximum expansion before the crust sets. The trapped heat then creates intense caramelization for that deep color and complex flavor. When you remove the lid, the dry heat finishes the job, creating that signature crackle. This two-stage baking—first with steam, then without—is the cornerstone of professional bread baking made accessible for home kitchens.
The Scoring Technique
Scoring isn't just decorative—it controls where the bread expands during oven spring. Use a very sharp knife, razor blade, or bread lame, and cut decisively in one swift motion about ½ inch deep. Hesitation creates ragged edges. The classic X pattern allows expansion in four directions, but you can also do diagonal slashes or decorative patterns. Always score just before baking when the dough is slightly chilled from resting, as this makes cleaner cuts. The cuts should open dramatically during baking, creating those beautiful ears of crispy crust.
Rosemary Garlic No-Knead Artisan Bread
📋 Ingredients
Dough Base
- 1 tablespoon olive oilUse good quality olive oil for best flavor; adds richness and helps create tender crumb
- 2 tablespoons fresh rosemary, finely choppedRemove leaves from stems and chop finely; fresh provides best flavor and aroma
- 4 cloves garlic, mincedMince finely for even distribution; fresh garlic provides brightest flavor
- Extra rosemary sprigs for toppingPressed onto surface before baking for visual appeal and extra herb flavor
- Coarse sea salt for sprinklingLarge flaky crystals provide texture and bursts of salinity; finish just before baking
Flavor Enhancers
- 3 cups all-purpose flour or bread flourUse unbleached for best flavor; bread flour creates chewier texture, AP flour is more tender
- 1½ teaspoons saltUse kosher or sea salt; controls fermentation and enhances all flavors significantly
- ¼ teaspoon active dry yeastSmall amount creates slow fermentation for complex flavor; check expiration date
- 1½ cups warm water (110°F)Should feel warm but not hot to touch; activates yeast and hydrates flour for open crumb
Instructions
Mix the Dough
In a large mixing bowl, combine flour, salt, and yeast. Add warm water, chopped rosemary, minced garlic, and olive oil. Stir with a wooden spoon until a shaggy, sticky dough forms—this should take about 1 minute of stirring. The dough will look rough and barely combined, which is perfect. No kneading required. Cover bowl tightly with plastic wrap or a damp kitchen towel.
First Rise
Let dough rest at room temperature (70-75°F) for 12-18 hours. The dough should double in size and become bubbly across the surface with visible air pockets. This long, slow fermentation develops incredible flavor and creates the characteristic holes in artisan bread. If your kitchen is cool, this may take up to 24 hours.
Shape and Second Rise
Generously flour a clean work surface. Turn out the sticky dough and flour your hands well. Gently shape into a round loaf by folding the edges toward the center, rotating as you go, handling minimally to preserve air bubbles. Place shaped loaf seam-side down on a piece of parchment paper. Cover loosely with a towel and let rise 1-2 hours until noticeably puffy.
Preheat Dutch Oven
Place a 6-7 quart Dutch oven with its lid in your oven. Preheat to 450°F for a full 30 minutes—don't skip this step. The pot must be extremely hot to create steam and that signature crispy, crackly crust. Use oven mitts when handling as it will be blazing hot.
Score and Bake Covered
Brush the top of the dough lightly with water using a pastry brush. Gently press fresh rosemary sprigs onto the surface and sprinkle with coarse sea salt. Using a very sharp knife or razor blade, score the top in an X pattern about ½ inch deep, working quickly and decisively. Carefully remove the hot Dutch oven, lift the parchment paper with the bread, and lower it into the pot. Cover with the lid and bake for exactly 30 minutes.
Finish Baking Uncovered
Carefully remove the lid (watch for steam) and continue baking uncovered for 15-20 minutes until the bread is deep golden brown all over. The crust should be hard to the touch and the bread should sound hollow when tapped on the bottom. Internal temperature should read 205-210°F on an instant-read thermometer. Use the parchment to lift the bread out and transfer to a wire cooling rack. Let cool completely for at least 1 hour before slicing—this allows the crumb structure to fully set.
Recipe Notes & Tips
Storage
Store cooled bread at room temperature wrapped in a clean kitchen towel or paper bag for 2-3 days. The crust will soften slightly over time. Avoid plastic bags which trap moisture and make the crust chewy. For longer storage, slice and freeze in a freezer bag for up to 3 months. Toast frozen slices directly or thaw at room temperature for 30 minutes.
Serving Suggestions
Serve warm with softened butter, olive oil and balsamic vinegar for dipping, or alongside Italian soups and pasta dishes. This bread makes excellent bruschetta when toasted and rubbed with garlic. It's also perfect for sandwiches, especially with fresh mozzarella, tomatoes, and basil. Pair with aged cheeses, cured meats, and olives for a rustic appetizer board.
Variations
Try other herb combinations like thyme and oregano, or add sun-dried tomatoes and olives for Mediterranean flair. For a cheesy version, fold in 1 cup shredded Parmesan or Gruyère after the first rise. Replace rosemary with fresh sage and add caramelized onions for a different flavor profile. You can also make this with whole wheat flour (substitute up to 1 cup of the all-purpose flour) for added nutrition and nutty flavor.