Olive Garden Breadsticks Recipe
Perfectly soft and buttery copycat Olive Garden breadsticks with garlic and herbs. Easy homemade recipe that tastes just like the restaurant favorite.


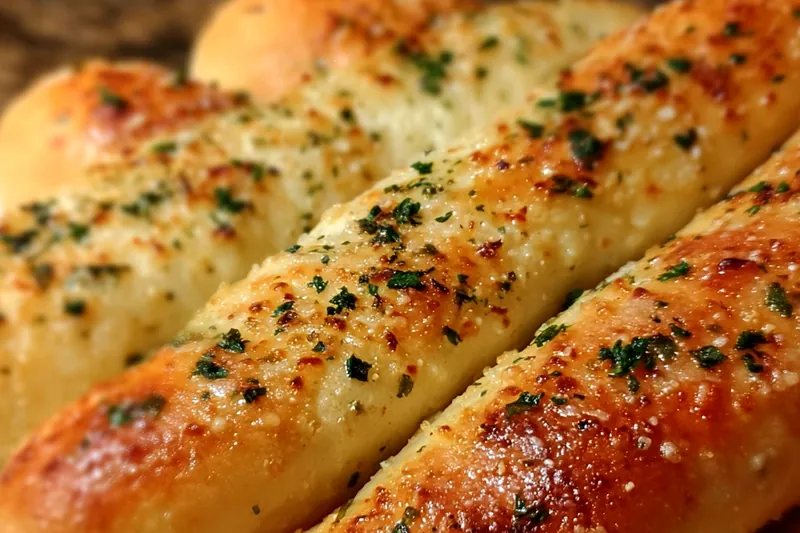
The Science of Perfect Breadsticks
Creating authentic Olive Garden-style breadsticks requires understanding the balance between softness and structure. The key is using bread flour for proper gluten development while maintaining enough moisture to create that characteristic tender crumb. The dough should be soft and slightly sticky, not dry or tough.
The signature flavor comes from the garlic butter finish applied while the breadsticks are still hot. This allows the butter to penetrate the crust slightly while the herbs and cheese adhere perfectly. The timing of this application is crucial for achieving that restaurant-quality taste and appearance.
💡 Professional Tip
For extra soft breadsticks, brush with melted butter before baking as well as after. This creates a tender crust and ensures maximum butter absorption for that authentic Olive Garden taste.
Frequently Asked Questions
Yes, after the first rise, punch down dough, cover tightly, and refrigerate up to 24 hours. Let come to room temperature before shaping and second rise.
You can substitute all-purpose flour, but add 1 tablespoon of vital wheat gluten per cup of flour for better texture, or use all-purpose flour as-is for slightly less chewy results.
Active yeast will become foamy and bubbly within 5-10 minutes. If nothing happens, your yeast may be expired or the water was too hot/cold. Start over with fresh yeast.
Yes, freeze baked breadsticks for up to 3 months. Thaw and reheat in 350°F oven for 5-7 minutes. You can also freeze shaped, unbaked breadsticks and bake directly from frozen (add 2-3 minutes).
Dense breadsticks usually result from too much flour, insufficient kneading, or not allowing proper rise time. Ensure your dough is soft and elastic, and allow full rising times.
Bake at 400°F until golden brown, about 12-15 minutes. For deeper color, brush with egg wash before baking, or increase temperature to 425°F and watch carefully.
Absolutely! Mix by hand and knead on a floured surface for 8-10 minutes until smooth and elastic. The dough should spring back when gently poked.
Store in airtight container at room temperature for 2-3 days. Reheat in 350°F oven for 3-5 minutes to restore softness and warm the garlic butter.
Recipe Troubleshooting Guide
Dough Won't Rise
Problem: Dough doesn't double in size during rising
Solution: Check yeast expiration date and water temperature (should be 110°F). Find a warmer spot or create a proofing environment by placing bowl near warm oven or in oven with light on.
Breadsticks Too Dense
Problem: Finished breadsticks are heavy and dense
Solution: Don't add too much flour during kneading. Dough should be slightly sticky. Ensure proper kneading (8-10 minutes) and full rise times. Check yeast freshness.
Tough or Chewy Texture
Problem: Breadsticks turn out tough instead of soft
Prevention: Avoid over-kneading or adding excess flour. Use bread flour for best results. Don't overbake - they should be golden but not dark brown.
Uneven Browning
Problem: Some breadsticks brown faster than others
Recovery: Ensure even spacing on baking sheet. Rotate pan halfway through baking. Check oven hot spots and adjust rack position to center of oven.
Garlic Butter Won't Stick
Problem: Garlic butter slides off breadsticks
Prevention: Apply garlic butter while breadsticks are hot from oven. Brush gently but thoroughly. Let cool slightly before adding cheese and herbs for better adherence.
Flavor Issues
Too Sweet: Add more garlic powder and Italian seasoning to the butter mixture
Too Salty: Reduce salt in dough or use unsalted butter and add salt to taste
Bland: Increase garlic, herbs, and Parmesan in the finishing butter. Add a pinch of garlic powder to the dough itself

Essential Bread-Making Ingredients
Quality ingredients make a significant difference in homemade breadsticks. Bread flour provides the protein content necessary for proper gluten development, creating that perfect chewy-yet-tender texture. Active dry yeast should be fresh and properly activated to ensure good rise and flavor development.
The garlic butter finish is what transforms simple breadsticks into Olive Garden magic. Fresh garlic provides the best flavor, while high-quality butter creates the rich coating. Italian seasoning should be aromatic and fresh - if yours has been sitting in the pantry for years, it's time for a replacement.
Essential Ingredient Notes
- Bread Flour: Higher protein content (12-14%) creates better gluten structure. If substituting all-purpose flour, the texture will be slightly less chewy but still delicious.
- Fresh Yeast: Check expiration dates and store in cool, dry place. Test yeast activity with warm water and sugar before making full recipe if you're unsure of freshness.
- Quality Butter: Use real butter, not margarine, for authentic flavor. European-style butter with higher fat content creates an even richer finish.
Mastering the Breadstick Technique
Proper kneading develops the gluten structure that gives breadsticks their characteristic texture. The dough should be smooth, elastic, and slightly tacky but not sticky. Under-kneaded dough will produce dense breadsticks, while over-kneaded dough becomes tough.
Shaping breadsticks requires a gentle touch. Roll each portion into an 8-inch rope using light pressure and smooth, even motions. Uneven shaping leads to irregular baking, so take time to make each breadstick uniform in thickness and length.
Perfect Shaping Method
Start from the center and roll outward with palms, applying gentle, even pressure. The breadsticks should be about 3/4 inch thick and 8 inches long for optimal baking.
Olive Garden Breadsticks Recipe
📋 Ingredients
For the Dough
- 115g unsalted butter, meltedCreates the signature rich coating
- 4 cloves garlic, mincedFresh garlic provides the best flavor
- 15g fresh parsley, choppedAdds color and fresh herb flavor
- 10g dried Italian seasoningSignature herb blend
- 5g garlic powderIntensifies the garlic flavor
- 60g grated Parmesan cheeseAdds nutty, savory finish
- Coarse sea salt for sprinklingFinal touch of flavor and texture
For the Garlic Butter Finish
- 480g bread flourHigher protein content for better texture
- 7g active dry yeastMust be fresh for proper rising
- 15g granulated sugarFeeds yeast and adds subtle sweetness
- 10g saltEnhances flavor and controls yeast
- 60ml olive oilAdds moisture and flavor
- 300ml warm water (110°F)Perfect temperature for yeast activation
Instructions
Activate Yeast
In a large bowl, combine warm water, sugar, and yeast. Stir gently and let stand for 5-10 minutes until foamy and bubbly.
Make Dough
Add olive oil, salt, and 3 cups of flour to the yeast mixture. Mix until a shaggy dough forms. Gradually add remaining flour until dough pulls away from sides of bowl. Knead on floured surface for 8-10 minutes until smooth and elastic.
First Rise
Place dough in oiled bowl, turning to coat all sides. Cover with damp towel and let rise in warm place for 1-1.5 hours until doubled in size.
Shape Breadsticks
Punch down dough and divide into 12 equal pieces. Roll each piece into 8-inch long rope. Place on greased baking sheets, cover, and let rise 30 minutes until puffy.
Bake and Finish
Preheat oven to 400°F. Bake breadsticks for 12-15 minutes until golden brown. Meanwhile, mix melted butter, garlic, parsley, Italian seasoning, garlic powder, and onion powder. Brush hot breadsticks with garlic butter mixture and sprinkle with Parmesan and sea salt.
Recipe Notes & Tips
Rising Environment
Create an ideal rising environment by placing the bowl in a slightly warm oven (turned off) with the light on, or on top of the refrigerator. Consistent warmth helps achieve proper rise.
Make-Ahead Tips
Dough can be made ahead and refrigerated after first rise. Shaped breadsticks can also be frozen on baking sheets, then stored in bags for up to 3 months. Bake directly from frozen.
Serving Suggestions
Serve warm with marinara sauce, alfredo sauce, or herb-infused olive oil for dipping. These breadsticks are perfect alongside pasta dishes, soups, or Italian salads.