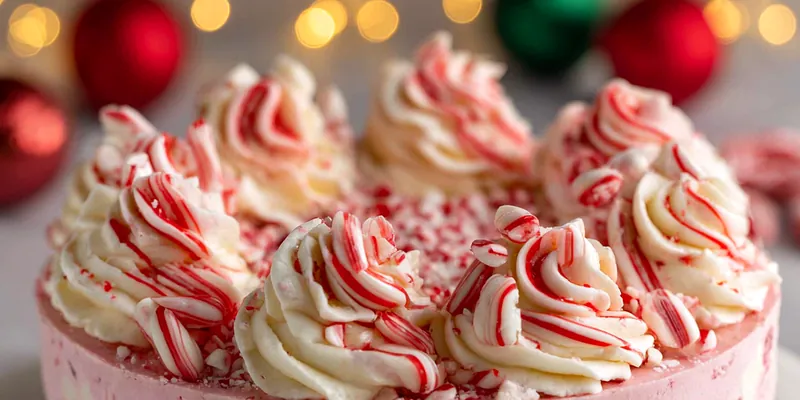
No-Bake Peppermint Cheesecake
Indulge in the festive flavors of this No-Bake Peppermint Cheesecake, an easy-to-make dessert that combines creamy cheesecake with a refreshing peppermint twist. Ideal for holiday gatherings or any special occasion, this recipe is sure to impress friends and family alike. With no baking required, it's a hassle-free treat that retains all the delightful flavors of a classic cheesecake.

Why This No-Bake Peppermint Cheesecake Recipe Works
This No-Bake Peppermint Cheesecake is a crowd-pleaser thanks to its rich, creamy texture and refreshing peppermint flavor. The no-bake method ensures that anyone can make it, regardless of baking experience. The use of crushed peppermint candies adds a delightful crunch and festive flair, making it perfect for holiday celebrations.
The technique involves folding whipped cream into the cream mixture, creating a light and airy texture. By chilling the cheesecake instead of baking, the peppermint flavor remains vibrant and fresh, while the crust maintains its perfect crunch. The result is a dessert that is both visually stunning and delectable.
💡 Professional Tip
For the best results, make sure your cream cheese is at room temperature before mixing. This ensures a smooth filling without lumps. If you want a more intense peppermint flavor, feel free to add a little extra peppermint extract to taste.
Frequently Asked Questions
Absolutely! The No-Bake Peppermint Cheesecake can be made up to two days in advance. Just cover it well and store it in the refrigerator. This allows the flavors to meld beautifully and can save you time during the busy holiday season.
If you need a substitute for cream cheese, you can use mascarpone cheese for a similar creamy texture. Alternatively, Greek yogurt can also work, though it may alter the flavor slightly and yield a tangier cheesecake.
Since this cheesecake is no-bake, it's done once it has set in the refrigerator for the required time. You should be able to slice it without it falling apart. The edges will hold their shape, and the center should be firm but still creamy.
Yes, you can freeze the No-Bake Peppermint Cheesecake! Just make sure to wrap it tightly in plastic wrap or aluminum foil. To serve, let it thaw in the refrigerator overnight for the best texture.
This cheesecake pairs beautifully with fresh berries or a drizzle of chocolate sauce. You could also serve it with extra whipped cream and crushed peppermint candies for added flavor and visual appeal.
When stored properly in an airtight container, the No-Bake Peppermint Cheesecake can last in the fridge for about 5-7 days. Ensure it's well covered to prevent it from absorbing any other odors in the refrigerator.
Yes! It's perfect for making in advance, allowing you to enjoy the flavors without the last-minute rush. Just be sure to give it enough time to chill and set properly before serving.
Since this cheesecake is served cold, you don’t need to reheat it. Just let it sit at room temperature for about 10-15 minutes before serving for the best texture.
Recipe Troubleshooting Guide
Too Dry
Problem: If your cheesecake feels dry or crumbly when cut, it may not have enough moisture.
Solution: Ensure that you are using full-fat cream cheese, and consider adding a bit more whipped cream to your filling for added moisture.
Not Crispy Enough
Problem: If the crust is too soft, it may not have been pressed firmly enough.
Solution: Make sure to press the crust mixture firmly into the pan before adding the filling, and you can bake it for 10 minutes to set it further if desired.
Overcooked
Problem: If you find your cheesecake too firm or rubbery, it may have been overmixed or had too much gelatin.
Prevention: Avoid overmixing the cream cheese and whipped cream. If using gelatin, follow the recommended amounts closely.
Undercooked Center
Problem: If the center is too soft and doesn't set, it may not have chilled long enough.
Recovery: Ensure the cheesecake is chilled for at least 4 hours or overnight for best results before serving.
Burnt Exterior
Problem: If the crust is burnt or overly dark, it may have been baked too long.
Prevention: Keep an eye on the crust during baking, and reduce baking time if needed for a golden-brown finish.
Flavor Balance
Too Sweet: If your cheesecake is too sweet, add a bit of lemon juice or salt to balance the flavors.
Too Salty: For a salty flavor, try reducing the salt in the crust and filling.
Bland: To enhance blandness, add more peppermint extract or sugar to taste.

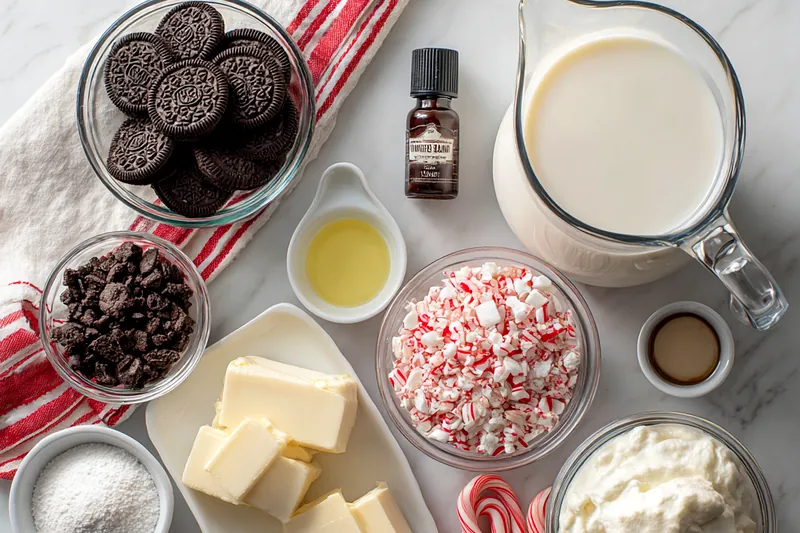
Essential Ingredients for No-Bake Peppermint Cheesecake
The key ingredients for this No-Bake Peppermint Cheesecake include cream cheese, heavy whipping cream, and crushed peppermint candies. Each ingredient plays a vital role in achieving the perfect texture and flavor balance. The cream cheese provides richness, while the whipped cream adds lightness.
Using high-quality ingredients is crucial for optimal flavor. Choose full-fat cream cheese for the best results, and fresh peppermint candies ensure that your cheesecake tastes as good as it looks. The graham cracker crust provides a classic base, adding a delightful crunch that contrasts with the creamy filling.
Essential Ingredient Notes
- Cream Cheese: For the best results, use full-fat cream cheese that is softened to room temperature. This will ensure a smooth and creamy filling without any lumps.
- Peppermint Extract: Choose a high-quality peppermint extract for the most authentic flavor. Start with the recommended amount, and adjust to your taste preference.
- Crushed Peppermint Candies: Use fresh, high-quality peppermint candies for the best texture and flavor. Crushing them just before use will keep them crunchy and vibrant.
Step-by-Step Cooking Process
No-Bake Peppermint Cheesecake is incredibly easy to make. The process begins with preparing the crust, followed by creating a smooth and creamy filling. The key is to fold the whipped cream gently into the cream cheese mixture to maintain its airy texture.
Chilling the cheesecake is crucial for achieving the right consistency; this allows the flavors to meld and the texture to become firm yet creamy. Following these steps will ensure a perfect dessert every time.
Key Technique for Perfect No-Bake Peppermint Cheesecake
The most important technique is gently folding the whipped cream into the cream cheese mixture. This creates a light, airy filling that melts in your mouth while maintaining a strong peppermint flavor.
No-Bake Peppermint Cheesecake
📋 Ingredients
Main Ingredients
- 1 cup butterRoom temperature
- 1 cup sugarGranulated
- 2 cups heavy creamWhipped
- 1 teaspoon vanilla extractPure
- 1/2 cup crushed peppermint candiesFor garnish
For the Sauce
- 2 cups crushed graham crackersFor the crust
- 1/2 cup unsalted butterMelted
- 1 cup granulated sugarFor the filling
- 2 cups cream cheeseSoftened
- 1 teaspoon vanilla extractFor flavor
- 1 teaspoon peppermint extractFor flavor
- 1 cup heavy whipping creamFor whipping
- 1/4 cup powdered sugarFor whipping cream
Instructions
Prepare the Crust
In a mixing bowl, combine crushed graham crackers and melted butter until well combined. Press the mixture into the bottom of a springform pan to form an even crust.
Make the Filling
In a large bowl, beat together the cream cheese, granulated sugar, vanilla extract, and peppermint extract until smooth and creamy.
Whip the Cream
In a separate bowl, whip the heavy cream and powdered sugar until stiff peaks form.
Combine Mixtures
Gently fold the whipped cream into the cream cheese mixture until fully combined. Be careful not to deflate the whipped cream.
Add Peppermint Candy
Fold in crushed peppermint candies to the filling mixture.
Fill the Crust
Pour the filling into the prepared crust, spreading it evenly. Smooth the top with a spatula.
Chill
Cover and refrigerate the cheesecake for at least 4 hours or until set.
Serve
Once set, carefully remove the cheesecake from the springform pan. Garnish with whipped cream, chocolate shavings, and additional crushed peppermint candies before serving.
Recipe Notes & Tips
Storage Tips
Store any leftover No-Bake Peppermint Cheesecake in an airtight container in the refrigerator. It can last for up to a week. For longer storage, consider freezing individual slices.
Serving Suggestions
Serve slices of No-Bake Peppermint Cheesecake with fresh whipped cream and a sprinkle of crushed peppermint on top. Pair it with a cup of hot cocoa or coffee for a delightful dessert experience.
Recipe Variations
You can customize this No-Bake Peppermint Cheesecake by adding chocolate layers or using different flavored extracts. Consider a chocolate crust or drizzling chocolate ganache on top for an added treat.