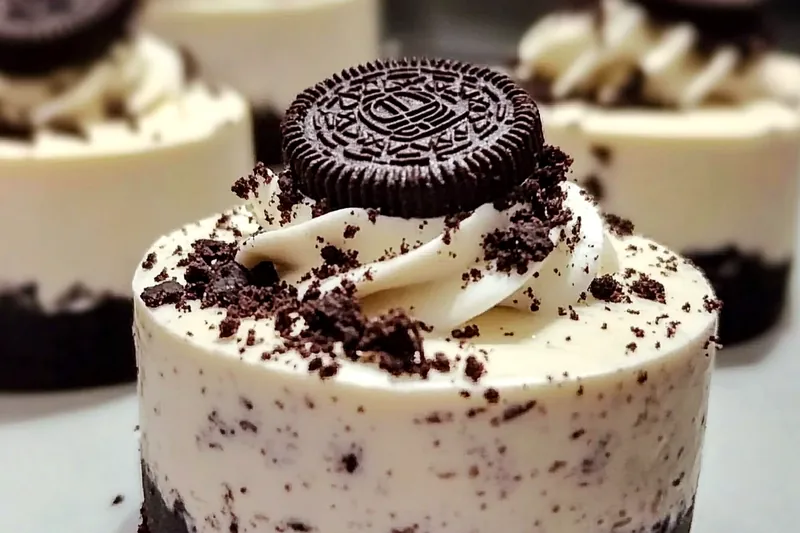
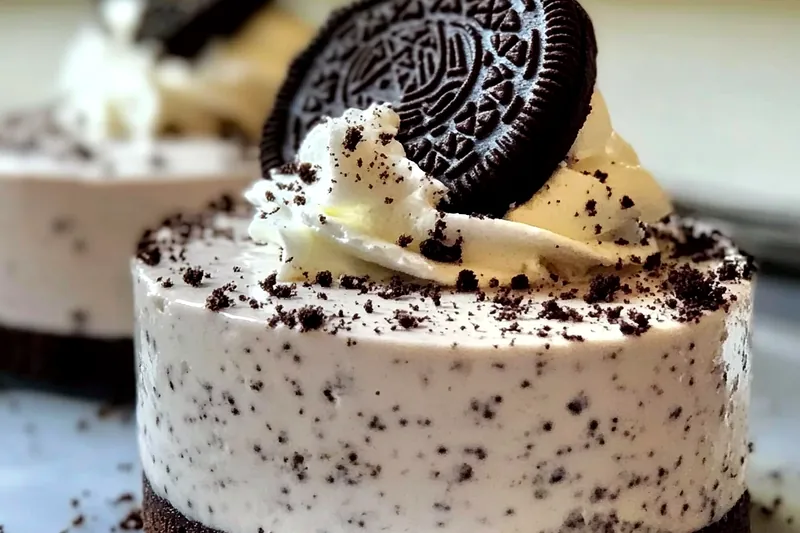
No-Bake Oreo Cheesecakes
Individual no-bake Oreo cheesecakes with chocolate cookie crust and creamy filling. Easy to make ahead and perfect for parties or special occasions.


No-Bake Cheesecake Mastery
The secret to perfect no-bake cheesecake lies in achieving the right texture without eggs or baking. Gelatin provides the structure needed to set the filling while maintaining a silky, creamy texture. The key is properly blooming and dissolving the gelatin to avoid any lumps or grittiness.
Room temperature cream cheese is crucial for a smooth filling. Cold cream cheese will create lumps that are difficult to eliminate, while properly softened cream cheese blends effortlessly with the other ingredients. The folding technique for the whipped cream ensures a light, airy texture.
💡 Professional Tip
Bloom gelatin in cold water for exactly 5 minutes, then dissolve completely in the microwave. Let it cool slightly before adding to prevent the cream cheese from seizing. Strain the mixture if any lumps remain.
Frequently Asked Questions
Gelatin is essential for the proper set of no-bake cheesecake. Without it, the filling will remain too soft to hold its shape. Agar-agar can be substituted for vegetarian version.
These can be made up to 3 days ahead. Cover individually with plastic wrap and refrigerate. Add final garnishes just before serving for the best presentation.
Strain the cream cheese mixture through a fine-mesh sieve, or use an immersion blender to smooth out any lumps. Always use room temperature cream cheese to prevent this issue.
Absolutely! Graham crackers, chocolate wafers, or even vanilla cookies work well. Adjust butter as needed - the mixture should hold together when pressed.
This usually means the gelatin wasn't properly dissolved or the mixture wasn't chilled long enough. Ensure gelatin is completely smooth and chill for at least 4 hours.
Yes! Use a 9-inch springform pan. Press crust into bottom, add filling, and chill. It will need 6-8 hours to set completely due to the thickness.
Cut into small cubes and let sit at room temperature for 30 minutes, or microwave in 10-second intervals, checking frequently to avoid melting.
Yes, freeze for up to 1 month without toppings. Thaw in refrigerator overnight and add garnishes before serving. Texture may be slightly different but still delicious.
Recipe Troubleshooting Guide
Lumpy Filling
Problem: Cream cheese mixture has lumps or isn't smooth
Solution: Use room temperature cream cheese, beat thoroughly, and strain mixture if needed. An immersion blender can help smooth stubborn lumps.
Won't Set
Problem: Cheesecake remains too soft after chilling
Solution: Ensure gelatin was completely dissolved and mixture was properly incorporated. Chill for additional time or add more dissolved gelatin.
Crust Too Crumbly
Problem: Cookie crust falls apart or won't hold together
Prevention: Add more melted butter gradually until mixture holds together when pressed. Make sure cookies are finely crushed for better binding.
Separated Filling
Problem: Filling appears separated or curdled
Recovery: This happens when gelatin is too hot when added. Let gelatin cool more before incorporating, and fold whipped cream gently to avoid deflating.
Too Sweet
Problem: Cheesecake is overly sweet
Prevention: Add a pinch of salt to balance sweetness, or serve with fresh berries or a tart fruit sauce to cut through the richness.
Flavor Balance Issues
Too Sweet: Add a squeeze of lemon juice or increase vanilla extract
Too Salty: Increase powdered sugar slightly or add more whipped cream
Bland: Increase vanilla extract, add lemon zest, or fold in more crushed Oreos
Individual Dessert Elegance
Individual cheesecakes offer several advantages over traditional large cheesecakes. They're perfectly portioned, eliminate the need for cutting and serving, and create an elegant presentation that's ideal for dinner parties or special occasions. Each guest receives their own beautiful dessert.
The no-bake method makes these desserts incredibly convenient for entertaining. They can be made days ahead, freeing up time for other party preparations. The individual format also allows for easy customization - some guests might prefer extra Oreo pieces or different toppings.
Essential Ingredient Notes
- Oreo Cookies: Use regular Oreos for best flavor and texture. Double-stuffed varieties can make the filling too sweet. Save some whole cookies for garnish before crushing the rest.
- Cream Cheese Quality: Use full-fat cream cheese for the richest texture and flavor. Low-fat versions don't set as well and have less creamy mouthfeel.
- Heavy Cream: Heavy cream must be cold for proper whipping. Chill the bowl and beaters too for best results. Don't overwhip or it will become grainy.
Make-Ahead Entertaining
These no-bake cheesecakes are the ultimate make-ahead dessert. They actually improve in texture and flavor after sitting overnight, as the filling firms up perfectly and the flavors meld together. This makes them ideal for stress-free entertaining.
The visual impact of individual desserts served in clear glasses creates an impressive presentation with minimal effort. Guests feel special receiving their own perfectly crafted dessert, and the layered appearance showcases the beautiful contrast between the dark cookie crust and creamy white filling.
Perfect Gelatin Integration
The key is adding slightly cooled dissolved gelatin to room temperature cream cheese while mixing constantly. This prevents the gelatin from seizing while ensuring even distribution.
No-Bake Oreo Cheesecakes
📋 Ingredients
For the Crust & Filling
- 480ml heavy whipping creamMust be cold for proper whipping
- 15g unflavored gelatinEssential for proper setting
- 60ml cold waterFor blooming the gelatin
- 12 whole Oreo cookiesFor beautiful garnish
- Chocolate shavingsAdds elegant finishing touch
- 12 serving glassesClear glasses show off layers
- Chocolate sauce (optional)For extra indulgence
For Assembly & Garnish
- 36 Oreo cookies, divided30 for crust, 6 for mixing in
- 85g unsalted butter, meltedBinds the cookie crust
- 680g cream cheese, softenedMust be room temperature
- 200g powdered sugarDissolves smoothly for silky texture
- 10ml vanilla extractEnhances the cream cheese flavor
Instructions
Prepare Crust
Remove filling from 30 Oreo cookies and crush cookies into fine crumbs. Mix with melted butter until evenly moistened. Press 2-3 tablespoons of mixture into bottom of each serving glass. Refrigerate while preparing filling.
Bloom Gelatin
Sprinkle gelatin over cold water in a small bowl and let bloom for 5 minutes. Microwave for 15 seconds and stir until completely dissolved. Let cool slightly.
Make Cheesecake Filling
Beat softened cream cheese until smooth and fluffy. Add powdered sugar and vanilla, beating until combined. Gradually add the cooled gelatin mixture. Crush remaining 6 Oreos and fold into mixture.
Whip and Fold Cream
In a separate bowl, whip heavy cream to stiff peaks. Gently fold one-third of whipped cream into cream cheese mixture to lighten, then fold in remaining cream until just combined.
Assemble and Chill
Divide filling among prepared glasses, smoothing tops. Top each with a whole Oreo cookie and chocolate shavings. Refrigerate for at least 4 hours or overnight until set. Serve chilled.
Recipe Notes & Tips
Setting Time
Allow at least 4 hours for proper setting, but overnight is even better. The cheesecakes will firm up perfectly and develop the best texture when given adequate chilling time.
Storage
Store covered in refrigerator for up to 3 days. The texture actually improves after the first day as flavors meld and the filling sets completely.
Serving Tips
Remove from refrigerator 10 minutes before serving to soften slightly. Garnish just before serving to maintain the best appearance and prevent soggy cookies.