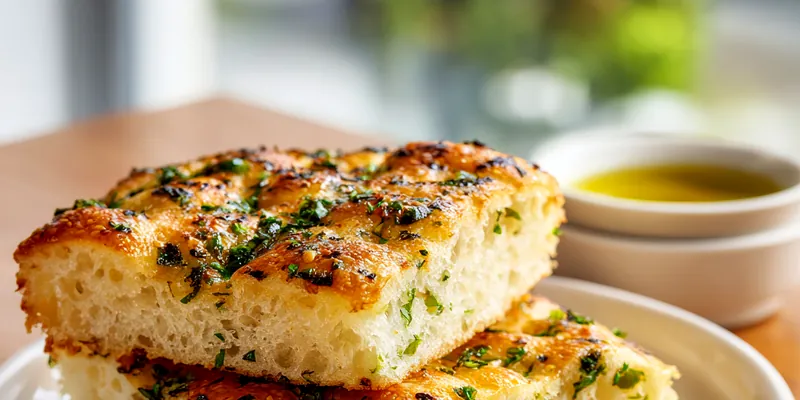
Homemade Rosemary Garlic Focaccia Bread
This rosemary garlic focaccia bread brings the authentic taste of Italian bakeries right to your kitchen. With its golden, crispy exterior and pillowy-soft interior infused with aromatic herbs, this bread is perfect alongside soups, salads, or simply enjoyed with good olive oil. The best part? It's surprisingly easy to make, even for beginner bread bakers.

The Art of Making Perfect Focaccia
Focaccia is one of Italy's most beloved flatbreads, originating from the Liguria region. What sets focaccia apart from other breads is its unique texture - a crispy, golden exterior that gives way to an airy, tender crumb. This is achieved through proper hydration, adequate rising time, and the signature dimpling technique that creates pockets for olive oil to collect. The key is using high-quality extra virgin olive oil, which not only adds flavor but also contributes to the bread's characteristic texture and golden color.
Traditional focaccia relies on a simple combination of flour, water, yeast, salt, and olive oil, but it's the technique that makes all the difference. The dough should be wet and slack - much wetter than typical bread dough. This high hydration creates those beautiful air pockets in the crumb. Don't be tempted to add more flour if the dough feels sticky; this moisture is essential. The gentle stretching and dimpling process, rather than aggressive kneading, preserves the air bubbles that make focaccia so wonderfully light.
💡 Professional Tip
Always use your fingertips to create deep, dramatic dimples in the dough right before baking. Press all the way down to the pan - these wells will fill with olive oil during baking, creating pockets of concentrated flavor and preventing the bread from becoming too puffy in spots.
Frequently Asked Questions
Yes! You can prepare the dough through the first rise, then cover and refrigerate for up to 24 hours. This slow, cold fermentation actually develops more complex flavors. When ready to bake, remove from the refrigerator, let it come to room temperature for about 30 minutes, then proceed with shaping, dimpling, and topping as directed. You can also bake the focaccia completely and store it wrapped at room temperature for 2 days, or freeze for up to 3 months.
While fresh rosemary provides the best flavor and visual appeal, you can use dried rosemary in a pinch. Use about 2 teaspoons of dried rosemary instead of 2 tablespoons fresh, as dried herbs are more concentrated. Rub the dried rosemary between your palms before sprinkling to release its oils. However, fresh rosemary is highly recommended as it becomes fragrant and slightly crispy during baking, adding wonderful texture.
Poor rising usually comes from inactive yeast or incorrect water temperature. Your water should be 110°F - warm to the touch but not hot. Water that's too hot will kill the yeast, while water that's too cold won't activate it. Also ensure your yeast hasn't expired. The rising environment matters too; dough rises best in a warm (75-80°F), draft-free spot. If your kitchen is cold, try placing the bowl in a turned-off oven with the light on.
All-purpose flour works perfectly for focaccia and is what I recommend for most home bakers. Bread flour can also be used and will create a slightly chewier texture due to its higher protein content. Avoid cake or pastry flour as they don't have enough protein to develop proper structure. For authentic Italian results, you can use Italian 00 flour, though it's not necessary for excellent focaccia.
Properly baked focaccia should be deeply golden brown on top with crispy edges. The internal temperature should reach 190-195°F when measured with an instant-read thermometer. The bottom should be golden and crisp when you lift it from the pan. If you tap the bottom, it should sound hollow. The edges will pull away slightly from the sides of the pan. If the top is browning too quickly but the center isn't done, tent loosely with foil for the last few minutes of baking.
Focaccia is incredibly versatile! Serve it alongside Italian soups like minestrone or tomato soup, with a cheese and charcuterie board, or as part of an antipasto spread. It's perfect for dipping in olive oil mixed with balsamic vinegar. You can also slice it horizontally to make phenomenal sandwiches, or serve it with pasta dishes to soak up sauces. For entertaining, cut it into small squares for an elegant appetizer alongside marinated olives and roasted vegetables.
Absolutely! Focaccia is wonderfully adaptable. Try cherry tomatoes (halved and pressed into the dough), caramelized onions, olives, sun-dried tomatoes, or different herbs like thyme or oregano. For a sweeter version, try grape focaccia with halved grapes and a drizzle of honey. You can also add grated Parmesan cheese or crumbled feta. Just be mindful not to overload the dough with heavy toppings, as this can prevent proper rising and create a dense texture.
Store cooled focaccia wrapped in plastic wrap or in an airtight container at room temperature for up to 2 days. To refresh leftover focaccia, wrap it in foil and warm in a 350°F oven for 10 minutes, or toast slices in a toaster oven. For longer storage, slice the focaccia, wrap pieces individually in plastic wrap, then place in a freezer bag and freeze for up to 3 months. Thaw at room temperature or toast directly from frozen.
Recipe Troubleshooting Guide
Dense, Heavy Texture
Problem: The focaccia turned out dense and cake-like instead of airy and light
Solution: This usually happens from insufficient rising time or too much flour. Make sure your dough doubles in size during both rises - this can take longer in cool kitchens. Don't add extra flour even if the dough seems sticky; a wet dough is essential for creating those air pockets. Also, be gentle when shaping and dimpling - aggressive handling deflates the air bubbles you've worked to create.
Pale, Undercooked Top
Problem: The focaccia is cooked through but the top didn't brown properly
Solution: Ensure you're drizzling enough olive oil on top before baking - the oil helps with browning. Your oven might also be running cool; use an oven thermometer to verify the temperature is truly 425°F. Position your rack in the middle of the oven. As a last resort, you can briefly turn on the broiler for 1-2 minutes at the end of baking, watching carefully to prevent burning.
Tough, Chewy Crust
Problem: The crust is too hard and chewy rather than crispy and tender
Prevention: This often results from overbaking or not enough olive oil. Reduce baking time by 3-4 minutes and ensure you're using enough oil both in the pan and drizzled on top. The oil creates steam during baking, which helps achieve a crispy but tender crust. Also make sure your oven isn't running too hot, which can cause the exterior to overcook before the interior is done.
Dough Stuck to Pan
Problem: The focaccia stuck to the baking pan and tore when removing
Recovery: Always oil your pan generously - don't skimp on this step. Use at least 2-3 tablespoons of olive oil to coat the bottom and sides thoroughly. After baking, let the focaccia cool for 5 minutes but not longer, as it becomes harder to remove as it cools completely. Run a knife around the edges before lifting. For stubborn cases, place the pan on a damp towel for a minute to loosen the bottom.
Burnt Garlic or Herbs
Problem: The garlic or rosemary burned and turned bitter during baking
Prevention: Make sure the garlic is evenly distributed and pressed into the dimples rather than sitting on top where it can burn. If your oven runs hot or you're using a dark pan (which conducts heat more efficiently), reduce temperature to 400°F and bake slightly longer. You can also cover the focaccia loosely with foil halfway through baking if the toppings are browning too quickly. Consider adding delicate herbs like garlic during the last 10 minutes of baking.
Flavor Balance Issues
Too Sweet: If your focaccia tastes too sweet, you may have added too much sugar. Reduce sugar to 1-2 teaspoons next time - just enough to feed the yeast without adding noticeable sweetness.
Too Salty: If too salty, make sure you're using the correct amount of fine salt in the dough and flaky salt on top. Remember that flaky sea salt is less dense than fine salt, so they're not interchangeable in equal amounts.
Bland: If the focaccia lacks flavor, increase the salt slightly (up to 1.5 teaspoons in the dough), use more garlic and herbs, and make sure you're using high-quality extra virgin olive oil - it contributes significant flavor. A cold fermentation in the refrigerator overnight also develops deeper, more complex flavors.
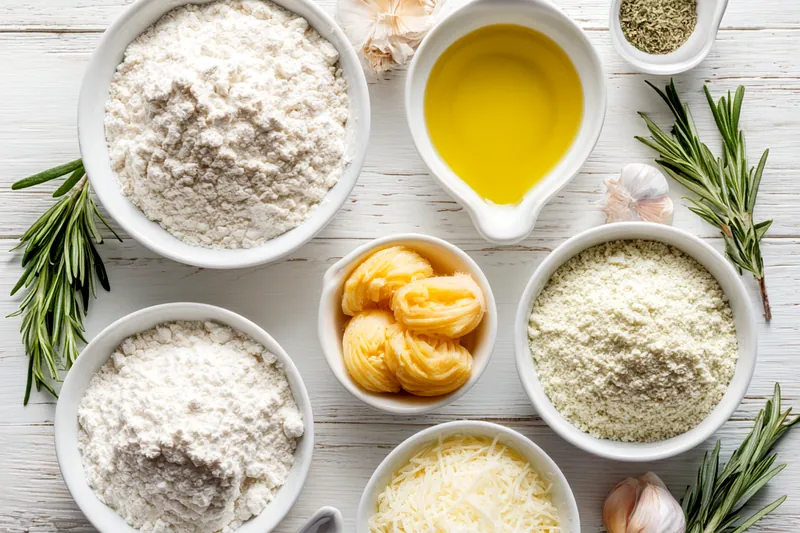
Choosing the Right Ingredients for Focaccia
The beauty of focaccia lies in its simplicity, which means each ingredient plays a crucial role. Extra virgin olive oil is perhaps the most important ingredient after flour - it provides flavor, creates the crispy exterior, and contributes to the tender crumb. Choose a high-quality, fruity olive oil that you'd be happy drizzling on salad. The flavor of the oil will come through clearly in the finished bread. For the most authentic results, look for Italian olive oil, particularly from Liguria if you can find it.
Fresh rosemary makes a significant difference compared to dried. When you bake fresh rosemary, the heat intensifies its piney, aromatic qualities and the needles become slightly crispy, adding textural interest. If you grow your own rosemary or have access to fresh herbs, this is the recipe to showcase them. Similarly, fresh garlic provides a more complex, sweet flavor when roasted on the bread compared to garlic powder. The quality of your flour matters too - while you don't need specialty flour, fresher flour that hasn't been sitting in your pantry for months will give better rise and flavor.
Essential Ingredient Notes
- Extra Virgin Olive Oil: Use a high-quality, fruity extra virgin olive oil as it dramatically impacts flavor. You'll need about 1/3 cup total - some mixed into the dough and more drizzled on top. Don't substitute with vegetable or canola oil, as olive oil is essential to authentic focaccia. The oil should be fresh and aromatic, not old or rancid.
- Fresh Rosemary: Fresh rosemary is strongly preferred over dried. Look for vibrant green sprigs with no brown or dry sections. Strip the needles from the stems and roughly chop - you want pieces large enough to provide visual appeal and textural interest. If rosemary is unavailable, fresh thyme or oregano also work beautifully.
- Instant Yeast: Instant yeast (also called rapid-rise or bread machine yeast) can be mixed directly into flour without proofing. If you only have active dry yeast, that works too - just dissolve it in the warm water first and let it sit for 5 minutes until foamy before proceeding. Check your yeast's expiration date to ensure it's still active.

Mastering the Focaccia Technique
The dimpling technique is what makes focaccia instantly recognizable and functionally important. Those characteristic indentations aren't just decorative - they serve to prevent large air bubbles from forming during baking, creating an even crumb throughout. They also create wells that collect olive oil, herbs, and seasonings, distributing flavor throughout the bread. Use your fingertips, not your whole hand, and press firmly all the way down to the bottom of the pan. Don't be shy about this step; aggressive dimpling is not only acceptable but encouraged. The dough will puff up during baking, so those deep dimples you create will become gentle valleys in the finished bread.
The rising times listed in this recipe are guidelines, not absolutes. Yeast activity depends heavily on temperature - in a warm kitchen (75-80°F), your dough might be ready in 90 minutes, while in a cooler space it might take a full 2 hours or longer. Look for visual cues: the dough should double in size and when you gently press a finger into it, the indentation should slowly spring back about halfway. If it springs back completely, it needs more time. If it doesn't spring back at all, you may have overproofed. Learning to read your dough rather than just watching the clock is one of the most valuable skills in bread baking.
The Perfect Dimple Technique
After the dough has been stretched into your oiled pan, let it rest for 2-3 minutes to relax. Using all ten fingertips, press firmly and decisively straight down through the dough until you feel the bottom of the pan. Create dimples about 2 inches apart across the entire surface. The dough will spring back slightly - this is normal. Immediately drizzle with olive oil so it pools in these indentations. This technique prevents uneven air pockets and creates the signature focaccia appearance and texture.
Homemade Rosemary Garlic Focaccia Bread
📋 Ingredients
Dough Ingredients
- 3 cups (375g) all-purpose flourSpoon flour into measuring cup and level off for accuracy. Bread flour also works for chewier texture.
- 1 tablespoon granulated sugarFeeds the yeast and helps with browning, but doesn't make the bread taste sweet.
- 2 teaspoons instant yeastAlso called rapid-rise yeast. Check expiration date to ensure it's active.
- 1 1/4 teaspoons fine sea saltDifferent from the flaky salt topping. Essential for flavor development in the dough.
- 1 cup (240ml) warm water (110°F)Should feel warm but not hot when tested on your wrist. Too hot kills yeast.
- 1/4 cup (60ml) extra virgin olive oil, plus more for drizzlingUse high-quality olive oil as it contributes significant flavor.
Topping Ingredients
- 3 cloves garlic, mincedFresh garlic roasts beautifully on focaccia. Can increase to 4-5 cloves for garlic lovers.
- 2 tablespoons fresh rosemary leaves, roughly choppedStrip from stems and chop roughly. Fresh makes a big difference over dried.
- 1 teaspoon flaky sea saltMaldon or similar. Adds delightful crunchy texture and bursts of salinity.
- 1/2 teaspoon black pepperFreshly ground pepper adds subtle heat and complexity. Optional but recommended.
Instructions
Make the Dough
In a large mixing bowl, combine flour, sugar, yeast, and fine sea salt. Add warm water and olive oil. Mix with a wooden spoon until a shaggy dough forms, then knead for 5-7 minutes until smooth and elastic. The dough should be soft and slightly sticky.
First Rise
Place dough in a lightly oiled bowl, turning to coat. Cover with a damp kitchen towel and let rise in a warm place for 1.5-2 hours until doubled in size.
Shape and Dimple
Oil a 9x13 inch baking pan generously. Transfer dough to the pan and gently stretch it to fit. If it resists, let it rest for 10 minutes then continue. Use your fingertips to create deep dimples all over the surface of the dough.
Add Toppings
Drizzle 2-3 tablespoons of olive oil over the dimpled dough. Sprinkle evenly with minced garlic, chopped rosemary, flaky sea salt, and black pepper. Let rest for 20-30 minutes while preheating oven to 425°F (220°C).
Bake
Bake for 22-25 minutes until golden brown on top and the edges are crispy. The internal temperature should reach 190°F. Remove from oven and brush with additional olive oil if desired.
Cool and Serve
Let cool in the pan for 5 minutes, then transfer to a wire rack. Slice into squares and serve warm or at room temperature. Best enjoyed within 2 days.
Recipe Notes & Tips
Storage
Store cooled focaccia wrapped in plastic wrap at room temperature for up to 2 days. For longer storage, wrap individual slices in plastic and freeze for up to 3 months. Refresh leftover focaccia by warming in a 350°F oven wrapped in foil for 10 minutes.
Serving Suggestions
Serve focaccia with soups, salads, or as part of an antipasto platter. Slice horizontally for sandwiches, or cut into small squares for appetizers. Pair with olive oil and balsamic for dipping, or serve alongside pasta dishes to soak up sauces.
Variations
Try cherry tomatoes, olives, caramelized onions, or different herbs like thyme. For grape focaccia, top with halved grapes and finish with honey. Add grated Parmesan or feta cheese for extra richness. You can also make a plain version and let guests customize their own pieces.