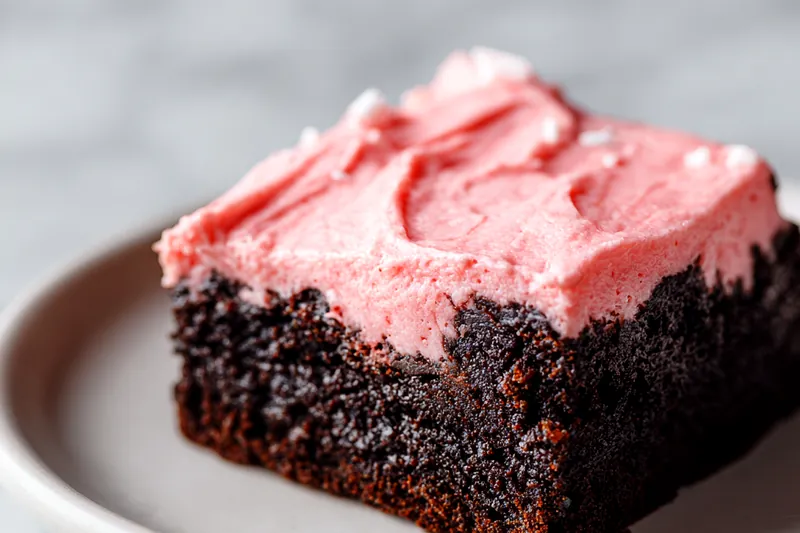
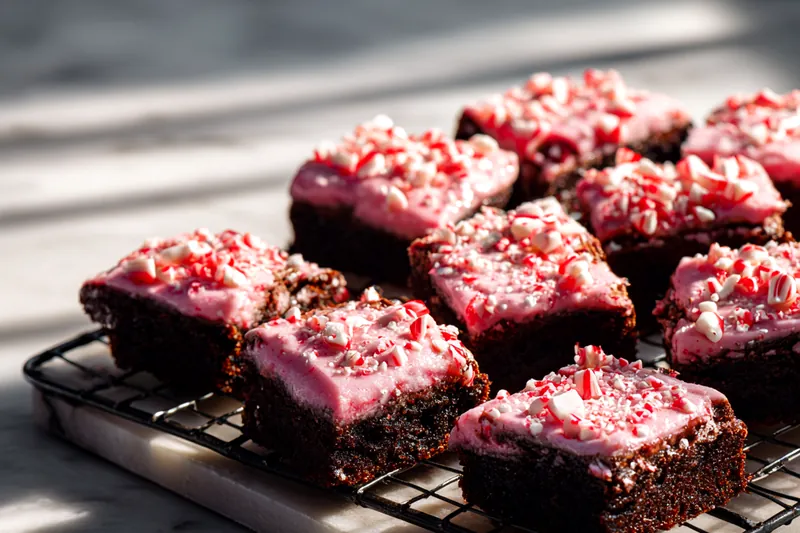
Fudgy Peppermint Brownies with Candy Cane Frosting
These fudgy peppermint brownies combine the best of holiday flavors with rich, chocolatey goodness topped with a smooth peppermint frosting. The candy cane pieces add the perfect festive crunch and visual appeal that makes these brownies a showstopper at any Christmas gathering. Whether you're baking for a cookie exchange or just craving a minty chocolate treat, this recipe delivers bakery-quality results every time.

The Secret to Perfect Fudgy Brownies
The foundation of exceptional peppermint brownies starts with achieving the ideal fudgy texture. This comes from the precise ratio of fat to flour and the careful balance of sugar and eggs. Using melted butter rather than oil creates a denser, more luxurious crumb, while the combination of cocoa powder and proper mixing technique ensures those signature crackly tops that brownie lovers adore. The key is to mix the batter just until the dry ingredients disappear—overmixing develops gluten and creates cake-like brownies instead of the fudgy texture we're after.
Baking time is critical for fudgy brownies. You want to remove them from the oven when they're just set around the edges but still slightly soft in the center. The toothpick test should yield moist crumbs, not completely clean results. The brownies will continue cooking as they cool in the pan, a process called carryover cooking. This technique ensures your brownies are perfectly fudgy rather than dry or underbaked. Patience during the cooling process is essential—cutting warm brownies results in messy squares and prevents the frosting from setting properly.
💡 Professional Tip
Always line your pan with parchment paper extending over the edges. This creates handles that let you lift the entire brownie slab out for cleaner cutting and easier serving. It also prevents any sticking issues that can ruin those perfect corner pieces.
Frequently Asked Questions
Yes, these peppermint brownies actually taste better the next day as the flavors meld. Bake and frost the brownies, then cover tightly with plastic wrap or store in an airtight container at room temperature for up to 3 days. For longer storage, freeze unfrosted brownies for up to 3 months, then thaw and frost before serving. The candy cane topping stays crunchy for about 2 days before beginning to soften from the frosting moisture.
While you can substitute vegetable oil for butter using a 1:1 ratio, butter creates a richer flavor and better texture. Butter contains milk solids that contribute to the fudgy density and create those desirable crispy edges. If you need a dairy-free option, use coconut oil which solidifies at room temperature similar to butter, providing comparable texture results.
Frosting consistency depends on the ratio of butter to powdered sugar and the amount of liquid added. If your frosting is too thick, add heavy cream one teaspoon at a time until spreadable. If it's too thin, add more powdered sugar a quarter cup at a time. Room temperature butter is crucial—cold butter won't incorporate properly, and melted butter will make the frosting soupy. Beat the frosting for the full 2 minutes to incorporate air and achieve a light, fluffy texture.
Peppermint oil is much more concentrated than extract, so you'll need significantly less. Start with just 2-3 drops of food-grade peppermint oil instead of the 1 teaspoon extract called for, then taste and adjust. Be cautious—too much peppermint oil creates an overwhelming, medicinal flavor. Peppermint extract is alcohol-based and provides a more balanced, rounded flavor that's easier to control for most home bakers.
Insert a toothpick about 2 inches from the edge of the pan—it should come out with a few moist crumbs but no raw batter. The center may look slightly underdone, which is perfect. The brownies will jiggle slightly when you gently shake the pan. The edges should be set and beginning to pull away from the pan sides. An instant-read thermometer inserted in the center should read 190-195°F for fudgy brownies.
These peppermint brownies pair beautifully with vanilla ice cream or fresh whipped cream to balance the richness. A hot cup of peppermint hot chocolate creates a double-mint experience, while strong coffee cuts through the sweetness perfectly. For holiday gatherings, serve alongside sugar cookies and gingerbread for a festive dessert spread. A glass of cold milk is always a classic pairing that complements the chocolate and mint flavors.
Absolutely! These brownies are delicious on their own or with different frosting flavors. Replace the peppermint extract with vanilla, almond, or orange extract for different variations. You could also make a simple chocolate ganache instead of the peppermint frosting, or dust the cooled brownies with powdered sugar for a more traditional presentation. The base brownie recipe is versatile and works with countless topping options.
Store frosted brownies in an airtight container at room temperature for up to 3 days, separating layers with parchment paper to prevent sticking. Refrigeration extends shelf life to 5 days but may cause the brownies to firm up—let them sit at room temperature for 20 minutes before serving for the best texture. For freezing, wrap individual brownies tightly in plastic wrap, then place in a freezer bag for up to 3 months. Thaw overnight in the refrigerator.
Recipe Troubleshooting Guide
Brownies Are Dry or Cakey
Problem: The brownies have a cake-like texture instead of being fudgy and moist, or they taste dry and crumbly.
Solution: This usually results from overbaking or too much flour. Reduce baking time by 2-3 minutes and check for doneness earlier. Ensure you're measuring flour correctly by spooning it into the measuring cup and leveling off, not scooping directly from the bag which packs the flour. Also check your oven temperature with an oven thermometer—many ovens run hot, which can dry out brownies quickly.
Frosting Won't Spread Smoothly
Problem: The peppermint frosting is difficult to spread and pulls up brownie crumbs, or it looks streaky and uneven.
Solution: Make sure your brownies are completely cool before frosting—warm brownies will melt the frosting. If the frosting is too stiff, add heavy cream one teaspoon at a time until it reaches a spreadable consistency. Use an offset spatula dipped in hot water and dried for the smoothest application. For a flawless finish, apply a thin crumb coat first, refrigerate for 15 minutes, then apply the final frosting layer.
Candy Canes Won't Stick to Frosting
Problem: The crushed candy cane pieces fall off the frosting or don't adhere properly to the surface.
Prevention: Apply the candy cane topping immediately after frosting while it's still soft and sticky. Gently press the candy pieces into the frosting with your palm or the back of a spoon to help them adhere. If the frosting has already formed a crust, lightly mist it with water from a spray bottle to make it tacky again before adding the candy. Refrigerating after topping helps set everything in place.
Brownies Stick to the Pan
Problem: The brownies are difficult to remove from the pan and break apart when trying to cut them, leaving a mess.
Recovery: Always line your pan with parchment paper that extends over the edges before adding batter. You can also grease the pan lightly before adding parchment for extra insurance. Let brownies cool completely in the pan before attempting to remove them—they firm up as they cool. Use the parchment paper overhang as handles to lift the entire brownie slab out of the pan before cutting.
Uneven Baking or Raw Center
Problem: The edges of the brownies are overdone while the center remains undercooked or raw after the recommended baking time.
Prevention: This typically indicates an oven hot spot or incorrect pan size. Use a light-colored metal pan rather than dark or glass, which conduct heat differently. Rotate the pan 180 degrees halfway through baking for more even results. If your oven has significant hot spots, place a baking sheet on the rack below to deflect direct heat. Consider using an oven thermometer to verify your actual oven temperature matches the dial setting.
Flavor Balance Issues
Too Sweet: If the brownies taste too sweet, reduce the sugar in the brownie batter by 1/4 cup, or balance the sweetness by adding 1/4 teaspoon of espresso powder to deepen the chocolate flavor. You can also use dark cocoa powder instead of regular for a more intense, less sweet chocolate taste.
Too Salty: If there's too much salt flavor, make sure you're using unsalted butter and measuring salt accurately with proper measuring spoons. A pinch of extra sugar in the frosting can help balance any saltiness. For the next batch, reduce the salt to 1/4 teaspoon.
Bland: If the brownies taste bland, increase the vanilla extract to 1.5 tablespoons and add 1/4 teaspoon espresso powder to enhance the chocolate flavor. Make sure you're using fresh, high-quality cocoa powder and peppermint extract, as old or low-quality extracts lose potency. A pinch of cinnamon can also add depth without being detectable.
Choosing Quality Ingredients for Best Results
The quality of your ingredients directly impacts the final taste and texture of these brownies. Start with high-quality unsweetened cocoa powder—Dutch-processed cocoa creates a darker color and more sophisticated flavor, while natural cocoa provides a more traditional brownie taste with slight acidity. Avoid hot chocolate mixes or sweetened cocoa products, which contain added sugar and milk powder that will throw off the recipe balance. Fresh cocoa powder makes a noticeable difference—if your cocoa has been sitting in the pantry for over a year, consider purchasing a new container for the best chocolate flavor.
For the peppermint element, pure peppermint extract delivers superior flavor compared to imitation versions, which can taste artificial or chemical. The candy canes should be fresh and crunchy—stale candy canes that have absorbed moisture won't provide the satisfying crunch that makes these brownies special. Choose candy canes without extra flavoring—just pure peppermint. For the butter, using European-style butter with higher fat content creates even richer brownies, though regular unsalted butter works beautifully. Room temperature eggs incorporate more easily and create better texture than cold eggs straight from the refrigerator.
Essential Ingredient Notes
- Unsweetened Cocoa Powder: Use high-quality Dutch-processed or natural unsweetened cocoa powder for the deepest chocolate flavor. Sift the cocoa powder to remove any lumps before adding to the batter. Dutch-processed cocoa creates a darker, smoother chocolate taste, while natural cocoa has a more intense, slightly acidic flavor. Store cocoa powder in an airtight container in a cool, dark place to maintain freshness for up to 2 years.
- Peppermint Extract: Always use pure peppermint extract rather than imitation for the best flavor. The extract should smell bright and fresh, not medicinal or artificial. Start with the recommended amount and taste the frosting before adding more—peppermint flavor intensifies as the brownies sit. Store peppermint extract in a cool, dark place and replace it annually for optimal flavor potency.
- Fresh Candy Canes: Choose firm, crunchy candy canes that snap cleanly when broken. Avoid candy canes that have become sticky or soft from age or humidity. Crush them in a sealed plastic bag using a rolling pin or the bottom of a heavy pan just before using to prevent moisture absorption. Standard red and white candy canes work perfectly, but you can experiment with different colors for varied presentations while keeping the classic peppermint flavor.
Mastering the Perfect Frosting Technique
Creating smooth, professional-looking frosting requires proper technique and temperature control. The butter must be at true room temperature—soft enough to leave an indent when pressed but not greasy or melted. This takes about 1-2 hours out of the refrigerator, depending on your kitchen temperature. Cold butter creates lumpy frosting that's difficult to spread, while melted butter produces soupy frosting that won't hold its shape. Beat the butter alone first to make it fluffy and light before gradually adding powdered sugar, which ensures smooth incorporation without lumps.
The secret to bakery-quality frosting is the final high-speed mixing after all ingredients are combined. This incorporates air into the frosting, making it lighter and more spreadable. Beat for a full 2 minutes at high speed, scraping down the bowl halfway through. The frosting should be pale, fluffy, and hold soft peaks. For the pink color, add food coloring one drop at a time—gel food coloring provides more vibrant color with less liquid than traditional food coloring. Apply the frosting generously with an offset spatula, using long, smooth strokes for the most professional appearance.
The Toothpick Test for Fudgy Brownies
The toothpick test is crucial but often misunderstood. Insert a toothpick or cake tester about 2 inches from the edge of the pan, not dead center. For fudgy brownies, you want to see moist crumbs clinging to the toothpick, not wet batter or a completely clean toothpick. The center should still look slightly underdone—it will continue cooking from residual heat as it cools. If you wait until the center tests completely clean, you'll have cakey brownies instead of fudgy ones. This technique takes practice to master, but once you recognize what moist crumbs look like versus raw batter, you'll bake perfect brownies every time.
Fudgy Peppermint Brownies with Candy Cane Frosting
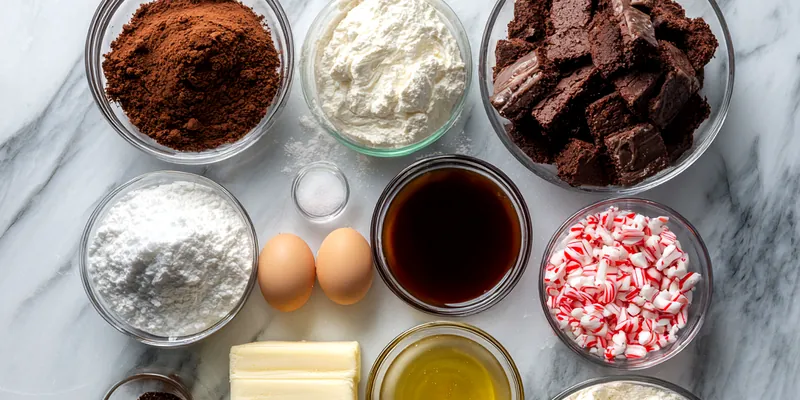
📋 Ingredients
For the Brownies
- 3 cups powdered sugarSift for smoothest frosting texture
- 1/2 cup butter, softenedMust be room temperature, not melted
- 3 tablespoons heavy creamAdd gradually for perfect consistency
- 1 teaspoon peppermint extractUse pure extract for best flavor
- Red food coloringStart with 3-4 drops for soft pink
- 1/2 cup crushed candy canesCrush just before using for crunch
For the Peppermint Frosting
- 1 cup unsalted butter, meltedCooled slightly but still liquid
- 2 cups granulated sugarCreates fudgy texture and crispy top
- 4 large eggs, room temperatureBring to room temp for best mixing
- 1 tablespoon vanilla extractPure vanilla enhances chocolate flavor
- 3/4 cup unsweetened cocoa powderSift to remove lumps before adding
- 1 cup all-purpose flourSpoon and level for accurate measure
- 1/2 teaspoon saltBalances sweetness and enhances flavor
- 1/2 teaspoon baking powderCreates slight rise for perfect texture
Instructions
Prepare Brownie Batter
Preheat oven to 350°F and line a 9x13 inch pan with parchment paper, leaving overhang on two sides. In a large mixing bowl, whisk together the melted butter and granulated sugar for about 1 minute until well combined and slightly lightened. Add eggs one at a time, whisking thoroughly after each addition, then stir in vanilla extract. Sift together the cocoa powder, flour, salt, and baking powder, then fold gently into the wet ingredients using a rubber spatula just until no streaks of flour remain. Do not overmix.
Bake Brownies
Pour the thick batter into your prepared pan and use an offset spatula to spread it evenly into all corners. Tap the pan gently on the counter a few times to release any air bubbles. Bake for 23-25 minutes, rotating the pan halfway through. The brownies are done when a toothpick inserted 2 inches from the edge comes out with moist crumbs but no raw batter. The center should still look slightly soft. Do not overbake. Cool completely in the pan on a wire rack for at least 1 hour before frosting.
Make Peppermint Frosting
In a large bowl, beat the softened butter with an electric mixer on medium speed for 1 minute until creamy and smooth. Reduce speed to low and gradually add powdered sugar one cup at a time, alternating with tablespoons of heavy cream. Once all sugar and cream are incorporated, add the peppermint extract and 3-4 drops of red food coloring. Increase mixer speed to high and beat for 2 full minutes, scraping down the bowl halfway through, until frosting is light, fluffy, and pale pink.
Frost and Finish
Use the parchment paper to lift the cooled brownies out of the pan and place on a cutting board. Spread the peppermint frosting evenly over the entire surface using an offset spatula, working from the center outward for the smoothest finish. Immediately sprinkle the crushed candy canes evenly over the frosting, pressing very gently with your palm to help them adhere. Refrigerate for 15 minutes to set the frosting. Cut into 16 squares using a large, sharp knife, wiping the blade clean between each cut for the neatest edges.
Recipe Notes & Tips
Storage
Store frosted brownies in an airtight container at room temperature for up to 3 days, or refrigerate for up to 5 days. Separate layers with parchment paper to prevent sticking. The candy cane topping will remain crunchy for about 2 days before beginning to soften from frosting moisture. For longer storage, freeze unfrosted brownies wrapped tightly in plastic wrap and foil for up to 3 months. Thaw overnight in the refrigerator, bring to room temperature, then frost before serving.
Serving Suggestions
Serve these peppermint brownies at room temperature for the best texture and flavor. Pair with vanilla ice cream, fresh whipped cream, or a glass of cold milk. They're perfect for holiday cookie exchanges, Christmas parties, or as a festive after-dinner dessert. For an elegant presentation, dust the serving plate with cocoa powder or add a sprig of fresh mint as garnish. These brownies also make wonderful homemade gifts when packaged in clear cellophane bags tied with ribbon.
Variations
For a darker chocolate version, replace 1/4 cup of cocoa powder with melted dark chocolate. Make them gluten-free by using a 1:1 gluten-free flour blend. For mint chocolate chip brownies, fold in 1 cup of dark chocolate chips before baking and reduce the candy cane topping. Create a white chocolate peppermint version by swirling in melted white chocolate before baking. For adults only, add 2 tablespoons of peppermint schnapps to the frosting and reduce the cream slightly.