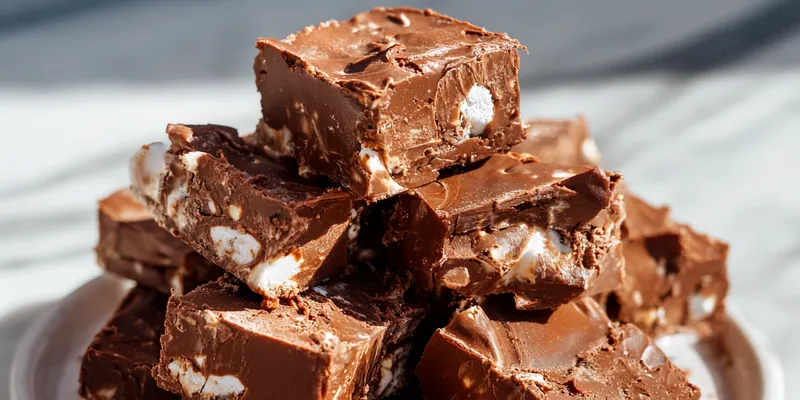
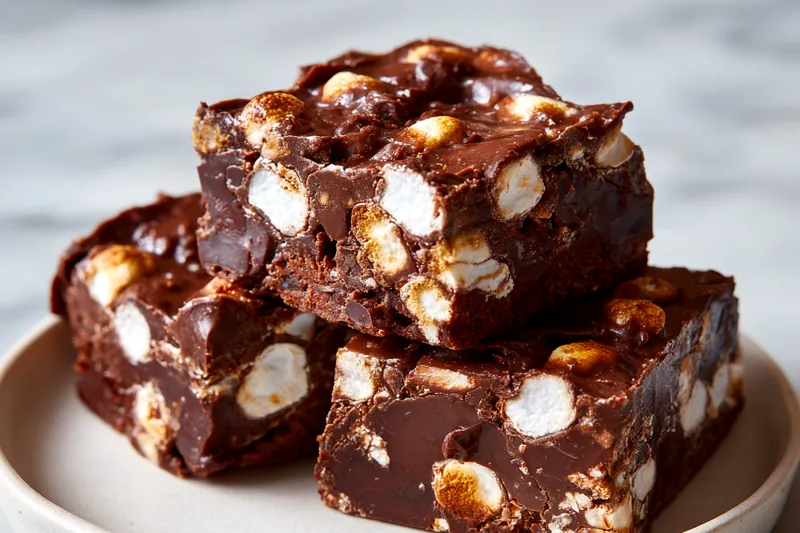
Easy Rocky Road Fudge Recipe
This classic Rocky Road Fudge brings together everything you love about the iconic flavor combination in one easy, no-bake treat. Rich chocolate fudge studded with pillowy marshmallows and crunchy nuts creates the perfect balance of textures and flavors. Whether you're making it for holiday gift-giving, a bake sale, or just because you're craving something indulgent, this foolproof recipe delivers bakery-quality results every single time.

Why This Rocky Road Fudge Recipe Works
The magic of this recipe lies in its simplicity and reliability. Unlike traditional fudge recipes that require boiling sugar to precise temperatures, this version uses sweetened condensed milk as a stabilizer. The condensed milk provides the perfect amount of sweetness and creaminess while ensuring your fudge sets properly every time. The combination of semi-sweet chocolate chips and butter creates a glossy, smooth texture that melts in your mouth without being overly sweet or grainy.
Temperature control is the secret to perfect Rocky Road Fudge. By allowing the melted chocolate mixture to cool for a few minutes before adding the marshmallows and nuts, you prevent the marshmallows from completely melting into the fudge. This preserves their distinctive fluffy texture and creates those beautiful pockets of white throughout the finished candy. The brief cooling period also helps the nuts maintain their crunch rather than becoming soggy. This attention to timing transforms a simple recipe into something truly exceptional.
💡 Professional Tip
For the smoothest, most professional-looking fudge, wipe your knife clean with a hot, damp cloth between each cut. This prevents the chocolate from dragging and creates clean, sharp edges on every piece.
Frequently Asked Questions
Absolutely! Rocky Road Fudge actually improves after a day or two as the flavors meld together. You can make it up to two weeks in advance if stored properly in an airtight container in the refrigerator. For longer storage, freeze individual pieces wrapped in wax paper and placed in a freezer bag for up to three months. Thaw at room temperature for about 30 minutes before serving.
Yes, you can easily customize the nuts to your preference or omit them entirely for a nut-free version. Walnuts and almonds are traditional, but pecans, cashews, or peanuts all work beautifully. If making nut-free fudge, consider adding extra marshmallows or incorporating other mix-ins like toffee bits, crushed cookies, or mini chocolate chips to maintain interesting texture throughout the fudge.
Grainy fudge typically results from overheating the chocolate or stirring too vigorously. Chocolate should be melted gently in short intervals, stirring between each heating period. If the mixture separates, it means the chocolate seized due to contact with water or steam, or from overheating. To prevent this, ensure all utensils are completely dry and use low heat or short microwave bursts. If it does seize, try whisking in a tablespoon of warm milk to bring it back together.
Semi-sweet chocolate chips are ideal because they provide the perfect balance of sweetness and chocolate intensity, especially since you're adding sweetened condensed milk. You can use milk chocolate chips for a sweeter, milder fudge, or dark chocolate chips for a more intense, less sweet version. Avoid using chocolate bars with added ingredients as they may affect the texture. Quality matters - better chocolate yields better fudge with smoother texture and richer flavor.
The fudge is properly set when it feels firm to the touch and doesn't leave an indentation when pressed gently. After the minimum 2-hour refrigeration time, test by touching the center of the fudge - it should feel solid but not rock hard. If it's still soft or sticky, continue chilling for another 30-60 minutes. The fudge will firm up significantly as it cools, so avoid the temptation to add extra chocolate thinking it's too soft while still warm.
Rocky Road Fudge is rich and sweet, so it pairs beautifully with coffee, hot chocolate, or a glass of cold milk. For elegant serving, arrange pieces on a platter alongside fresh berries, which provide a tart contrast to the sweet fudge. It's also wonderful as part of a dessert board with other candies, cookies, and fresh fruit. For gifting, layer pieces in decorative boxes with parchment paper between layers.
Definitely! This recipe is incredibly versatile. Try adding 1/2 cup of dried cherries or cranberries for a fruity twist, swirl in 1/4 cup of peanut butter before adding marshmallows, or sprinkle sea salt on top for salted chocolate fudge. You can also experiment with different extracts - peppermint or almond extract adds a wonderful dimension. Just keep the total volume of mix-ins around 2.5 to 3 cups so the fudge maintains its structure.
Store Rocky Road Fudge in an airtight container with parchment or wax paper between layers to prevent sticking. It will keep at room temperature for 3-4 days in cool weather, but refrigeration extends shelf life to 2 weeks and prevents the chocolate from blooming or becoming too soft. Always let refrigerated fudge sit at room temperature for 10-15 minutes before serving for the best texture and flavor. Avoid storing in humid conditions as this can cause the chocolate to sweat.
Recipe Troubleshooting Guide
Fudge Won't Set
Problem: After hours of chilling, your fudge remains soft and won't firm up properly.
Solution: This usually means the chocolate-to-milk ratio was off or the mixture wasn't cooked enough. Try chilling it overnight - sometimes it just needs more time. If it's still too soft after 12 hours, you can reheat the entire batch, add 1/2 cup more chocolate chips, re-melt everything together, and start over. For future batches, ensure you're using the exact measurements and that the chocolate is completely melted and smooth before proceeding.
Marshmallows Melted Completely
Problem: The marshmallows disappeared into the fudge instead of staying intact and visible.
Solution: This happens when the chocolate mixture is too hot when you add the marshmallows. Next time, let the melted chocolate cool for 5-7 minutes instead of 3-4 minutes, stirring occasionally. The mixture should feel warm but not hot to the touch. You can also place mini marshmallows in the freezer for 10 minutes before adding them, which gives them extra staying power against the warm chocolate.
Fudge is Too Hard
Problem: Your fudge came out rock-hard and difficult to cut or bite into.
Prevention: Overly hard fudge typically means too much chocolate or over-chilling. Let it sit at room temperature for 20-30 minutes before cutting and serving. If you're storing it in the refrigerator, always allow adequate warming time before serving. For future batches, try reducing the chocolate by 1/4 cup or adding an extra tablespoon of butter to create a softer, creamier texture.
Uneven Distribution of Mix-Ins
Problem: All the marshmallows and nuts sank to the bottom or clustered in certain areas.
Recovery: This occurs when the chocolate mixture is too thin or you didn't fold quickly enough. Work more quickly when incorporating mix-ins, and use a folding motion rather than stirring to maintain even distribution. If you notice ingredients sinking while spreading in the pan, wait 2-3 minutes for the mixture to thicken slightly, then gently redistribute the toppings with a spoon before chilling.
Fudge Sticks to Pan
Problem: The fudge won't release from the pan or tears when you try to remove it.
Prevention: Always line your pan with parchment paper with at least 2 inches of overhang on two opposite sides - this creates handles for easy removal. If you forgot to line the pan, let the fudge warm to room temperature, then carefully run a thin knife around the edges and underneath. In the future, you can also lightly spray the parchment paper with cooking spray for even easier release, though it's usually not necessary.
Flavor Balance Issues
Too Sweet: If your fudge is too sweet, use dark chocolate chips (60-70% cacao) instead of semi-sweet, or reduce sweetened condensed milk by 2 tablespoons and add 1 tablespoon of heavy cream instead.
Too Salty: Fudge is rarely too salty, but if it happens, it's likely from salted nuts. Always use unsalted nuts and unsalted butter, adding just a pinch of salt to enhance chocolate flavor without making it taste salty.
Bland: To boost flavor, increase vanilla extract to 2 teaspoons, add 1/4 teaspoon of espresso powder to intensify chocolate taste, or sprinkle flaky sea salt on top before chilling for a gourmet flavor contrast.

Choosing the Right Ingredients for Perfect Fudge
The quality of your ingredients directly impacts the final texture and flavor of your Rocky Road Fudge. Semi-sweet chocolate chips are the gold standard for this recipe because they melt smoothly and provide consistent results. Look for chips that list chocolate or cocoa as the first ingredient rather than sugar. Brand matters less than quality - even store brands work well if they're real chocolate. Avoid baking chips labeled as candy coating or melting wafers, as these contain different stabilizers that can affect texture.
Your sweetened condensed milk should be full-fat for the creamiest fudge - low-fat versions can result in a grainy texture and don't set as reliably. Fresh mini marshmallows work best because they're soft and pliable; stale marshmallows won't incorporate as well and may remain hard. When selecting nuts, choose raw or lightly toasted varieties rather than heavily salted or flavored versions. Freshness matters with nuts - they should smell sweet and nutty, not rancid. Toast them lightly yourself if you want enhanced flavor, letting them cool completely before adding to the fudge.
Essential Ingredient Notes
- Chocolate Chips: Use chips specifically designed for baking rather than eating chocolate bars. Chips contain stabilizers that help them hold their shape, which translates to smoother melting. Store chocolate chips in a cool, dry place away from strong odors. If using chocolate bars instead, chop them finely for even melting.
- Mini Marshmallows: Mini marshmallows distribute more evenly than large ones and create better visual appeal. Keep them fresh in a sealed bag - exposure to air makes them hard and crusty. For extra staying power, freeze them for 10 minutes before adding to slightly warm chocolate. Always use regular marshmallows, not marshmallow fluff or creme, which have different moisture content.
- Nuts: Walnuts offer a traditional flavor, while almonds provide a milder taste and prettier appearance when sliced. Pecans add buttery richness. Chop nuts to roughly 1/4-inch pieces for the best distribution and eating experience. Toast nuts at 350°F for 5-7 minutes to enhance their flavor, but cool them completely before adding to prevent melting marshmallows.
Mastering the Technique for Foolproof Fudge
The key to smooth, creamy fudge lies in gentle heat and patience. When melting chocolate, always use low power settings or indirect heat to prevent seizing - chocolate that gets too hot can become grainy and separated. Microwave melting works beautifully if done in 30-second intervals with stirring between each heating. The residual heat continues melting the chocolate even between intervals, so don't be tempted to overheat. The mixture should be completely smooth and glossy, with no lumps remaining, before you proceed to the next step.
The cooling period before adding mix-ins is absolutely critical to success. This brief rest allows the chocolate to thicken slightly and cool enough that marshmallows retain their shape rather than melting away. You'll know it's ready when the mixture is still pourable but noticeably thicker than when first melted. When folding in marshmallows and nuts, work with a light hand - aggressive stirring can break up marshmallows or cause them to melt from the friction heat. Use a folding motion, bringing mixture from bottom to top, rotating the bowl as you go, until everything is evenly distributed.
The Perfect Fold
Folding is a gentle mixing technique that preserves the integrity of delicate ingredients. Use a rubber spatula and imagine you're cutting through the center of the mixture, scraping along the bottom of the bowl, and bringing the bottom mixture up and over the top. Rotate the bowl a quarter turn and repeat. This motion incorporates ingredients thoroughly while minimizing deflation or breakage. For Rocky Road Fudge, proper folding keeps marshmallows intact and distributes nuts evenly without overworking the chocolate.
Easy Rocky Road Fudge Recipe
📋 Ingredients
Chocolate Base
- 3 cups semi-sweet chocolate chipsUse quality baking chips for smooth, even melting
- 1 can (14 oz) sweetened condensed milkFull-fat only for creamiest texture
- 2 tablespoons unsalted butterAdds richness and silky smooth finish
- 1 teaspoon vanilla extractPure vanilla enhances chocolate flavor
- 1/4 teaspoon saltBalances sweetness and deepens chocolate notes
Mix-Ins & Toppings
- 2 cups mini marshmallowsFresh mini marshmallows stay softer and distribute better
- 1 cup chopped walnuts or almondsChop to 1/4-inch pieces for best texture
- 1/2 cup additional mini marshmallows for toppingCreates beautiful presentation and extra texture
Instructions
Prepare Pan and Melt Chocolate
Line an 8x8 inch baking pan with parchment paper, leaving overhang on sides for easy removal. In a large microwave-safe bowl, combine chocolate chips, sweetened condensed milk, and butter. Microwave in 30-second intervals, stirring between each, until completely smooth and melted, about 2-3 minutes total.
Add Flavorings
Stir in vanilla extract and salt until well combined. Let the mixture cool for 3-4 minutes, stirring occasionally. This prevents the marshmallows from melting completely when added.
Fold in Mix-Ins
Gently fold in 2 cups of mini marshmallows and chopped nuts until evenly distributed throughout the fudge. Work quickly but gently to maintain the marshmallow shape and prevent them from melting.
Set and Finish
Pour fudge mixture into prepared pan and spread evenly with a spatula. Press additional marshmallows on top for decoration. Refrigerate for at least 2 hours or until completely firm.
Cut and Serve
Using the parchment overhang, lift fudge from pan onto a cutting board. Use a sharp knife, wiping clean between cuts, to slice into 24 squares. Store in an airtight container.
Recipe Notes & Tips
Storage
Store in an airtight container at room temperature for up to 4 days, or refrigerate for up to 2 weeks. Layer pieces with parchment paper to prevent sticking. Freeze for up to 3 months wrapped individually in wax paper. Let come to room temperature for 15 minutes before serving for best texture and flavor.
Serving Suggestions
Serve alongside hot coffee, tea, or cold milk. Perfect for holiday dessert trays, bake sales, or gift boxes. Package in clear bags tied with ribbon, or layer in decorative tins with parchment between layers. Pairs beautifully with fresh berries or vanilla ice cream for an elegant dessert.
Variations
Try dark chocolate chips for intense chocolate flavor, add 1/2 cup dried cherries or cranberries for fruity twist, swirl in peanut butter before chilling, or substitute pecans or cashews for the walnuts. For peppermint rocky road, add 1/2 teaspoon peppermint extract and crushed candy canes. Make it nut-free by using extra marshmallows and crushed graham crackers instead.