Easy Geode Cookies Recipe
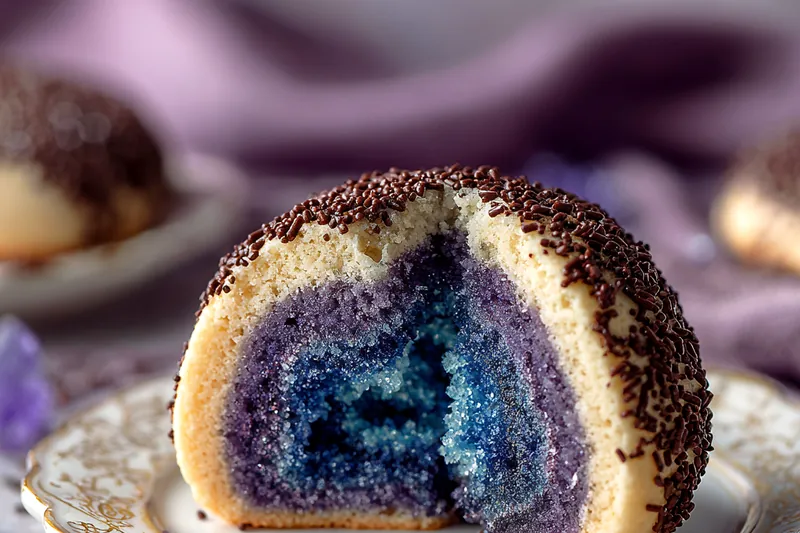
These stunning geode cookies look like they came from a fancy bakery, but they're surprisingly simple to make at home! With layers of vibrant purple and blue cookie dough wrapped around sparkling rock candy crystals, each slice reveals a beautiful cross-section that's almost too pretty to eat. They're perfect for birthdays, baby showers, galaxy-themed parties, or anytime you want to impress your guests with a show-stopping dessert.


What Makes Geode Cookies So Special
Geode cookies are the perfect intersection of art and baking. These stunning treats create the illusion of slicing open a real geode rock, revealing sparkling crystals inside. The technique involves layering different colored cookie doughs and embedding rock candy or isomalt crystals in the center before slicing and baking. What makes them particularly impressive is that despite their sophisticated appearance, they're made from basic sugar cookie dough that anyone can master.
The beauty of geode cookies lies in their versatility. You can customize the colors to match any party theme – think pink and gold for a princess party, green and silver for a mermaid theme, or traditional purple and blue for a geology-inspired celebration. The rock candy center adds a delightful crunch and extra sweetness that contrasts beautifully with the tender, buttery cookie. Each cookie is unique, with its own crystal formation and color pattern, making them feel extra special.
💡 Professional Tip
For the most dramatic effect, use gel food coloring rather than liquid – it creates more vibrant colors without adding extra moisture that could affect the cookie texture. Also, don't be afraid to create an ombre effect by using different shades of the same color in your dough layers.
Frequently Asked Questions
Absolutely! The unbaked cookie dough log can be made up to 3 days ahead and kept tightly wrapped in the refrigerator, or frozen for up to 2 months. Just slice and bake when you're ready. Baked cookies can be stored in an airtight container at room temperature for up to 5 days, though the rock candy may start to dissolve slightly in humid conditions.
While you can use liquid food coloring, gel food coloring is strongly recommended for geode cookies. Gel colors are more concentrated, so you'll get more vibrant, saturated colors without adding excess moisture to your dough. Liquid food coloring can make your dough too soft and sticky to work with properly. If you must use liquid, start with very small amounts and be prepared to add a bit more flour to compensate.
Rock candy is available at most craft stores, candy shops, or online retailers. If you can't find it, you can substitute with crushed hard candies (like Jolly Ranchers), isomalt crystals (available at baking supply stores), or even coarse decorating sugar for a different effect. The key is using something that won't melt completely during baking and will provide that crystal-like sparkle in the center.
Not at all! You can use as many or as few colors as you like. Two-color geodes (one color plus plain dough) work beautifully and are even easier to assemble. You could also create a monochromatic look with different shades of the same color, or go wild with rainbow layers. The basic technique remains the same regardless of how many colors you choose.
Geode cookies are done when the edges look set and dry but the centers still appear slightly soft and underbaked. They should not brown at all – you want to preserve those beautiful colors! The cookies will be very soft when they first come out of the oven but will firm up as they cool. If you overbake them, they'll become hard and crunchy rather than tender. Start checking at 10 minutes and don't bake longer than 12-13 minutes.
Geode cookies are show-stoppers on their own and pair perfectly with cold milk, hot chocolate, or coffee. For a party spread, arrange them on a platter with other galaxy-themed treats like star-shaped sugar cookies, vanilla cupcakes with galaxy frosting, or a colorful fruit platter. They also make wonderful gifts when packaged in clear cellophane bags tied with ribbon – the colors really pop when displayed this way.
Yes! You can substitute the all-purpose flour with a 1:1 gluten-free baking flour blend. Make sure your blend contains xanthan gum for the best texture. The cookies may be slightly more delicate when handling, so be extra gentle when wrapping the dough around the rock candy. Chill the dough a bit longer (about 2 hours) to make slicing easier.
Store cooled geode cookies in an airtight container at room temperature for up to 5 days. Place parchment paper between layers to prevent sticking. Avoid storing in humid conditions or the refrigerator, as moisture can cause the rock candy centers to become sticky or dissolve. For longer storage, freeze unfrosted cookies in a freezer-safe container for up to 2 months. Thaw at room temperature before serving.
Recipe Troubleshooting Guide
Dough Too Sticky to Handle
Problem: After adding food coloring, the dough becomes too soft and sticky to roll or shape properly.
Solution: This usually happens from adding too much gel coloring or from warm butter. Refrigerate the dough for 15-20 minutes to firm it up. If it's still too sticky, knead in 1-2 tablespoons of flour at a time until the dough is manageable. Make sure your butter is softened but not melted when you start, and work in a cool kitchen if possible.
Colors Bleeding Together
Problem: The different colored layers are mixing and creating muddy-looking cookies instead of distinct layers.
Solution: Make sure each colored dough log is well-chilled before assembling. When layering, press gently but don't overwork or knead the dough. If colors start to blend while rolling, chill the assembled log for 30 minutes before continuing. Also ensure you're using gel colors that are fully kneaded into each portion before assembly.
Cookies Spreading Too Much
Problem: The cookies spread out too much during baking, losing their defined layers and shape.
Prevention: The dough log must be thoroughly chilled before slicing – at least 1 hour, or even overnight. Use cold dough slices straight from the fridge onto your baking sheet. Don't let them sit at room temperature. Also, check that your butter was properly measured and not too soft when mixing. If needed, pop the sliced unbaked cookies in the freezer for 10 minutes before baking.
Rock Candy Melting Completely
Problem: The rock candy crystals are melting entirely and oozing out of the cookies.
Recovery: Your oven temperature may be too high or you're baking too long. Use an oven thermometer to verify your oven temperature is accurate at 350°F. Rock candy will soften and become slightly glossy during baking, but shouldn't melt completely. Reduce baking time to 10 minutes and watch carefully. Larger rock candy pieces hold up better than crushed pieces.
Cookies Breaking When Slicing
Problem: The dough log cracks or crumbles when trying to slice it, ruining the pattern.
Prevention: The dough needs to be properly chilled but not frozen solid. If it's too hard, let it sit at room temperature for 5-10 minutes before slicing. Use a very sharp knife and wipe it clean between each cut. Apply gentle, even pressure and use a sawing motion rather than pressing straight down. If the dough is too soft, return it to the refrigerator for additional chilling.
Flavor Balance Issues
Too Sweet: If cookies taste too sweet from the rock candy, reduce the sugar in the dough by 2 tablespoons or use smaller pieces of rock candy in the center. You can also balance the sweetness by adding a pinch more salt or using salted butter.
Too Salty: If cookies taste too salty, reduce the salt to just 1/8 teaspoon next time. Make sure you're using unsalted butter as specified. The chocolate sprinkles on the outside can also add saltiness, so you might omit those if sensitivity to salt is an issue.
Bland: If cookies lack flavor, increase vanilla extract to 1 tablespoon or add 1/2 teaspoon almond extract for more depth. Make sure your vanilla is pure extract, not imitation. You can also add a small amount of citrus zest (lemon or orange) to the dough for brightness.

Choosing the Right Ingredients for Perfect Geode Cookies
The foundation of great geode cookies starts with quality ingredients. Use unsalted butter that's truly softened to room temperature – not melted or too cold. It should leave a slight indent when pressed but still hold its shape. This ensures proper creaming with the sugar for a tender, melt-in-your-mouth texture. All-purpose flour works perfectly for these cookies, providing just enough structure to hold the layers while remaining tender. Don't substitute cake flour or bread flour as they'll change the texture significantly.
The star ingredients for the visual impact are gel food colors and rock candy crystals. Invest in professional-grade gel food coloring from brands like Americolor or Wilton – these create those vivid, saturated colors that make geode cookies so striking. Rock candy can be found in the candy aisle of craft stores or ordered online in various colors. Blue is traditional, but pink, purple, green, or clear all work beautifully. Look for rock candy on sticks or in crystallized form, avoiding anything with added flavors that might affect the taste.
Essential Ingredient Notes
- Gel Food Coloring: Use professional gel food coloring for the most vibrant colors without adding excess moisture. Start with a small amount – you can always add more, but you can't take it away. Knead the color thoroughly into the dough until completely uniform with no streaks. AmeriColor Deep Pink and Navy Blue create stunning jewel tones.
- Rock Candy Crystals: Choose rock candy pieces that are roughly 1/2 to 1 inch in size for the best effect. Larger pieces create more dramatic geodes and are less likely to melt completely during baking. If using rock candy on sticks, break it off the stick into chunks. Blue is classic, but experiment with different colors to match your theme.
- Unsalted Butter: Always use unsalted butter so you can control the salt level in your cookies. It should be softened to about 65-68°F – soft enough to blend easily but not greasy or shiny. Leave it at room temperature for about 30-45 minutes, or cut it into cubes to speed up softening. Never microwave butter to soften it as this can create hot spots that affect texture.
Mastering the Geode Cookie Technique
Creating perfect geode cookies is all about patience and proper layering technique. After dividing and coloring your dough, work with each portion individually to create smooth, even logs. The key is pressing the layers together firmly enough that they'll hold during slicing, but gently enough that the colors remain distinct. When embedding the rock candy, create a slight channel down the center of your layered dough and nestle the crystals in, then carefully wrap the dough around them, pinching seams closed. The dough should completely encase the crystals with no gaps.
The chilling step is absolutely crucial and cannot be rushed. A minimum of one hour in the refrigerator allows the dough to firm up completely, making clean slicing possible. For the cleanest slices, use a very sharp knife and clean it between each cut – this prevents color transfer and ensures each cookie has crisp, defined layers. Bake at the lower end of the time range and watch carefully; the difference between perfectly tender cookies and overdone ones is just a minute or two. The cookies will look slightly underdone in the center when you remove them, but they'll continue to set as they cool.
The Perfect Slice Technique
Achieving clean, beautiful slices is essential for showcasing your geode cookies' stunning interior. After chilling your dough log thoroughly, use a long, sharp chef's knife rather than a serrated knife. Wipe the blade with a damp cloth between each slice to remove any color buildup or crumbs. Use a gentle sawing motion rather than pressing straight down – this prevents squashing the log and keeps your layers intact. If you notice the dough becoming too soft while slicing, return it to the refrigerator for 15 minutes. For perfectly uniform cookies, aim for slices that are about 1/4 inch thick, which will spread slightly during baking to the ideal thickness. Don't slice more than 8-10 cookies at a time before returning the log to chill.
Easy Geode Cookies Recipe
📋 Ingredients
Cookie Dough Base
- 2 3/4 cups all-purpose flourSpoon and level for accuracy – don't pack
- 1 cup unsalted butter, softenedShould be room temperature, about 65°F
- 3/4 cup granulated sugarRegular white sugar works best
- 1 large eggRoom temperature for best mixing
- 2 teaspoons vanilla extractPure vanilla, not imitation
- 1 teaspoon baking powderFor light, tender texture
- 1/4 teaspoon saltEnhances flavor
Colors & Decoration
- Purple gel food coloringAmeriColor or Wilton brand work best
- Blue gel food coloringNavy or royal blue creates best effect
- 1 cup blue rock candy crystalsLarger pieces work better than crushed
- 1/4 cup chocolate sprinkles (optional)For decorative edge
Instructions
Prepare Cookie Dough
In a large bowl, cream together softened butter and sugar until light and fluffy, about 3 minutes. Beat in egg and vanilla extract until well combined. In a separate bowl, whisk together flour, baking powder, and salt. Gradually add dry ingredients to wet ingredients, mixing until a soft dough forms.
Color the Dough
Divide dough into three equal portions. Leave one portion plain (cream colored). Tint the second portion with purple gel food coloring, kneading until color is evenly distributed. Tint the third portion with blue gel food coloring. For a gradient effect, create a lighter purple by mixing less coloring into part of the purple dough.
Assemble Geode Cookies
Roll each colored dough into logs about 1 inch thick. Flatten slightly and layer them together (purple, blue, cream) to create striped layers. Press rock candy crystals into the center of the layered dough, then fold dough around to enclose the crystals completely. Roll gently to smooth. If desired, roll outer edge in chocolate sprinkles.
Chill and Slice
Wrap the dough log tightly in plastic wrap and refrigerate for at least 1 hour or until firm. This makes slicing easier and helps cookies hold their shape. Once chilled, slice into 1/4-inch thick rounds using a sharp knife. Wipe knife between cuts for clean edges.
Bake to Perfection
Preheat oven to 350°F (175°C). Line baking sheets with parchment paper. Place cookie slices 2 inches apart on prepared sheets. Bake for 10-12 minutes, just until edges are set but not browned. The centers should look slightly underdone. Cool on baking sheet for 5 minutes before transferring to a wire rack to cool completely.
Recipe Notes & Tips
Storage
Store baked cookies in an airtight container at room temperature for up to 5 days. Unbaked dough logs can be refrigerated for 3 days or frozen for up to 2 months. Slice and bake directly from frozen, adding 1-2 minutes to baking time.
Serving Suggestions
Serve these stunning cookies on a simple white platter to let the colors shine. They pair beautifully with vanilla ice cream, hot cocoa, or as part of a dessert buffet. For parties, arrange them standing upright to showcase the geode cross-section.
Variations
Try different color combinations like pink and gold, green and white, or rainbow layers. You can also add almond extract for flavor variation, use different colored rock candy, or substitute the chocolate sprinkles with colored sanding sugar or edible glitter for extra sparkle.