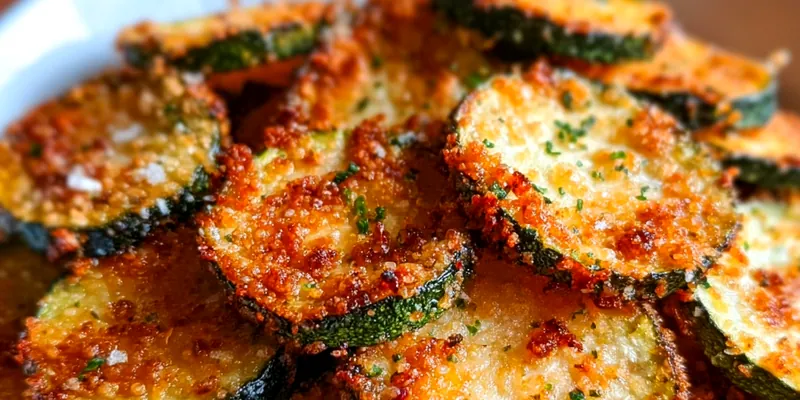
Crispy & Healthy Zucchini Chips
Perfectly crispy baked zucchini chips that are healthy, low-carb, and irresistibly crunchy. Made with simple seasonings for a guilt-free snack.

The Science of Crispy Zucchini Chips
Achieving perfectly crispy zucchini chips requires understanding moisture management. Zucchini contains about 95% water, which must be removed for crispiness. Salting draws out moisture through osmosis, while low-temperature baking slowly dehydrates the slices without burning them.
The key to success lies in patience and proper preparation. Uniform slicing ensures even cooking, while the salt-and-rest technique creates the foundation for crispiness. Low-temperature baking allows moisture to evaporate gradually, concentrating flavors while creating that satisfying crunch.
💡 Professional Tip
Use a mandoline slicer for perfectly uniform thickness. Inconsistent slicing leads to some chips burning while others remain soggy. If you don't have a mandoline, take extra care with knife work for even results.
Frequently Asked Questions
Aim for 1/8-inch thickness (about 3mm). Thicker slices won't get crispy, while thinner slices may burn. Consistent thickness is more important than exact measurement.
Yes! Dehydrate at 135°F for 6-8 hours until crispy. The process takes longer but uses less energy and may produce even more consistent results.
Insufficient moisture removal is the main culprit. Salt longer, pat completely dry, don't overlap on baking sheets, and ensure your oven temperature is accurate.
Yes, though they won't brown as nicely. Use cooking spray or skip oil entirely and increase seasoning. They'll still be crispy but may look paler.
Store in an airtight container at room temperature for up to 3 days. If they lose crispiness, re-crisp in a 200°F oven for 10-15 minutes.
Absolutely! Try ranch seasoning, curry powder, nutritional yeast, or cinnamon for sweet chips. Experiment with different herb and spice combinations.
Choose firm, medium-sized zucchini with unblemished skin. Avoid very large ones as they tend to be watery and seedy. Smaller zucchini have better texture.
Yes, they're perfect for meal prep! Make up to 2 days ahead and store properly. They're great for parties, lunch boxes, or healthy snacking.
Recipe Troubleshooting Guide
Chips Not Crispy
Problem: Zucchini chips remain soft and chewy
Solution: Increase baking time, ensure proper moisture removal with salt, slice thinner, and don't overcrowd baking sheets. Check oven temperature accuracy.
Uneven Browning
Problem: Some chips brown while others stay pale
Solution: Ensure uniform slicing thickness, rotate baking sheets every 30 minutes, and don't overlap chips. Consider using convection setting if available.
Chips Burn
Problem: Edges or entire chips turn dark brown or black
Prevention: Lower oven temperature to 200°F, slice slightly thicker, or reduce oil. Some ovens run hot - use an oven thermometer to verify temperature.
Bitter Taste
Problem: Finished chips taste bitter or unpleasant
Recovery: Use fresher zucchini, rinse after salting to remove excess salt, or reduce salt amount. Large, old zucchini can develop bitter compounds.
Lose Crispiness Quickly
Problem: Chips become soft shortly after making
Prevention: Ensure complete moisture removal before baking, bake until fully crispy, and store in airtight container with silica gel packet to absorb moisture.
Seasoning Issues
Too Sweet: Add a pinch of garlic powder or smoked paprika for more savory depth
Too Salty: Rinse zucchini after salting step, or reduce salt in seasoning mix
Bland: Increase seasoning amounts, add nutritional yeast for umami, or finish with lemon zest
Choosing the Right Zucchini
The quality of your zucchini directly impacts the final result. Choose firm, medium-sized zucchini with glossy, unblemished skin. Avoid oversized zucchini, which tend to be watery and contain large seeds that affect texture and flavor.
Fresh zucchini should feel heavy for its size and have a slight give when gently pressed. The skin should be free of soft spots, wrinkles, or discoloration. Peak season zucchini (summer months) typically have the best flavor and texture for chip-making.
Essential Ingredient Notes
- Zucchini Selection: Look for zucchini that are 6-8 inches long and 2 inches in diameter. They should feel firm and heavy with bright, glossy skin.
- Salt Quality: Use coarse sea salt or kosher salt for the moisture-drawing step. Fine table salt can be too harsh and may over-salt the chips.
- Oil Selection: Light olive oil or avocado oil work best for their neutral flavor and higher smoke points. Avoid extra virgin olive oil as it can become bitter at low temperatures over long periods.
Mastering the Low-Temperature Technique
Low-temperature baking is essential for achieving crispy zucchini chips without burning. The gentle heat slowly removes moisture while allowing the natural sugars to concentrate and develop flavor. This method requires patience but produces superior results to high-heat cooking.
Proper air circulation is crucial during the baking process. Avoid overcrowding baking sheets, and rotate them regularly to ensure even dehydration. The chips are done when they feel completely dry and snap when bent - they'll continue to crisp as they cool.
Perfect Timing and Temperature
Bake at 225°F for optimal results. Higher temperatures will brown the outside before moisture evaporates from the center, resulting in chewy chips. Lower temperatures extend cooking time unnecessarily.
Crispy & Healthy Zucchini Chips
📋 Ingredients
Main Ingredients
- 2.5g garlic powderAdds savory depth without moisture
- 2.5g onion powderComplements garlic for savory base
- 1.25g black pepperAdds mild heat and complexity
- 1.25g paprikaProvides color and mild sweetness
- 1.25g dried oreganoClassic herb for savory flavor
- 30g grated Parmesan (optional)Adds umami and richness
- Pinch of cayenne (optional)For those who like a little heat
Seasonings
- 2 large zucchini (about 680g)Choose firm, medium-sized zucchini
- 15ml olive oilLight coating helps browning and seasoning adherence
- 5g sea saltEssential for drawing out moisture
Instructions
Prepare Zucchini
Preheat oven to 225°F. Wash zucchini and pat completely dry. Using a mandoline slicer or sharp knife, slice zucchini into 1/8-inch thick rounds. Lay slices on paper towels and sprinkle both sides with salt. Let sit for 10 minutes to draw out moisture.
Remove Moisture
Pat zucchini slices thoroughly dry with paper towels, pressing gently to remove as much moisture as possible. This step is crucial for achieving crispiness.
Season and Arrange
In a large bowl, combine garlic powder, onion powder, black pepper, paprika, oregano, thyme, and cayenne if using. Lightly brush zucchini slices with olive oil and toss with seasoning mixture. Arrange in single layer on parchment-lined baking sheets, ensuring slices don't overlap.
Bake Low and Slow
Bake for 1.5-2 hours, flipping halfway through, until edges are golden brown and chips are crispy. Rotate baking sheets every 30 minutes for even cooking. Chips should feel dry and crisp when done.
Cool and Serve
Remove from oven and immediately sprinkle with Parmesan cheese if using. Let cool completely on baking sheets - they'll continue to crisp as they cool. Store in airtight container for up to 3 days.
Recipe Notes & Tips
Storage Tips
Store completely cooled chips in an airtight container at room temperature. Add a silica gel packet (like those from vitamin bottles) to absorb any residual moisture and maintain crispiness longer.
Flavor Variations
Try different seasoning blends: ranch powder, curry spices, nutritional yeast for cheesy flavor, or cinnamon and stevia for sweet chips. The possibilities are endless!
Nutrition Benefits
These chips are low in calories, high in vitamin C and potassium, and contain antioxidants. They're perfect for keto, paleo, and low-carb diets while satisfying chip cravings.