Chocolate Rice Krispie Balls Arranged
Delightfully crispy chocolate rice krispie balls perfectly arranged for parties and special occasions. Easy no-bake treat with rich chocolate coating.

The Art of Perfect Arrangement
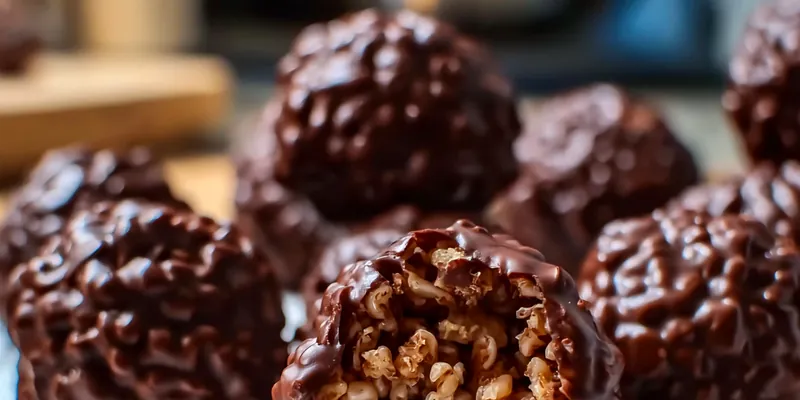
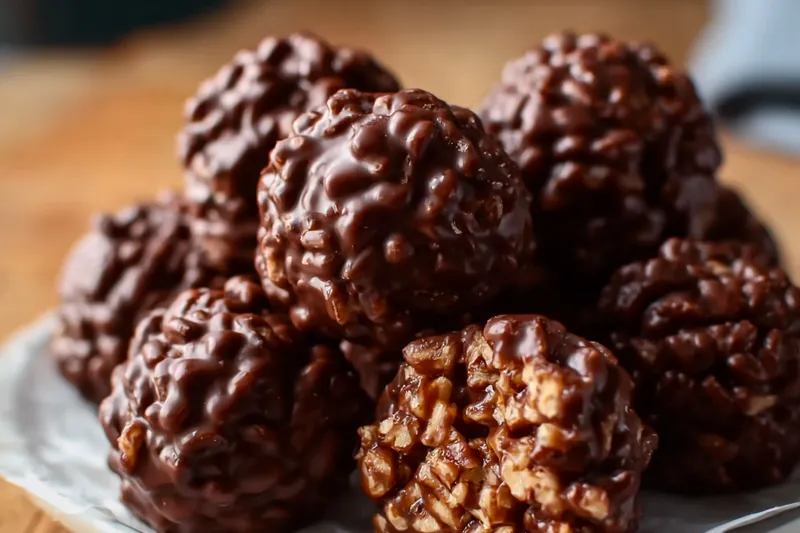
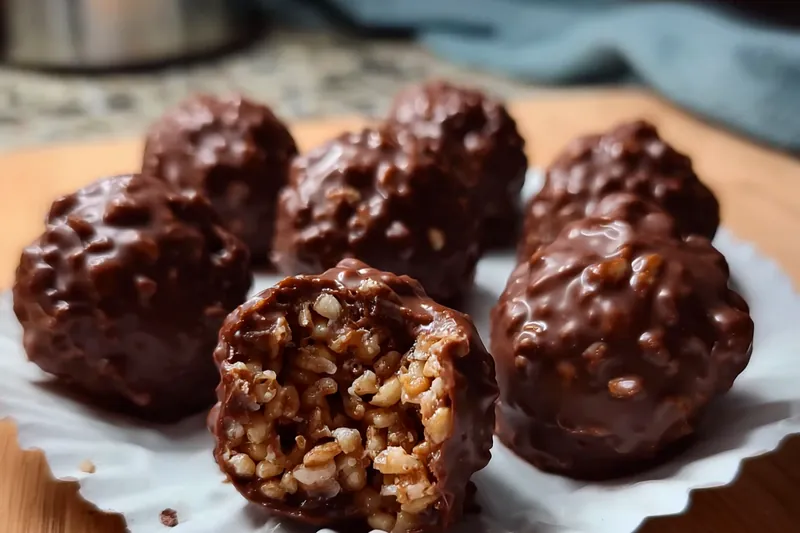
Creating visually appealing arrangements with chocolate rice krispie balls is about consistency and pattern. Uniform sizing is crucial - use a small ice cream scoop to ensure each ball is exactly the same size, creating a professional, polished look when arranged.
The key to successful chocolate coating is temperature control. The chocolate should be warm enough to coat easily but not so hot that it melts the cereal's crispiness. This balance creates the perfect texture contrast between the smooth exterior and crunchy interior.
💡 Professional Tip
Chill your hands briefly before shaping the balls if the mixture is too warm. This prevents the chocolate from melting on your fingers and helps create perfectly smooth, round shapes.
Frequently Asked Questions
Store in an airtight container at room temperature for up to 1 week, or refrigerate for up to 2 weeks. They're best enjoyed within the first few days for optimal crispiness.
Absolutely! White chocolate works wonderfully. You may need to add a bit more coconut oil as white chocolate can be thicker when melted.
Try arranging in concentric circles on a round platter, in neat rows on rectangular trays, or create height variation using tiered serving stands for visual impact.
Yes! Make mini balls (1 inch) for bite-sized treats or larger ones (2 inches) for more substantial servings. Adjust the quantity accordingly.
Chopped nuts, colorful sprinkles, shredded coconut, mini chocolate chips, or a light dusting of powdered sugar all work beautifully and add visual appeal.
Yes, they freeze well for up to 3 months. Thaw at room temperature for 30 minutes before serving to restore the perfect texture.
Let the chocolate mixture cool for 2-3 minutes before adding cereal, and chill your hands while shaping. The coconut oil helps prevent excessive stickiness.
Definitely! Try peppermint extract, almond extract, or orange zest. Start with 1/2 teaspoon and adjust to taste.
Recipe Troubleshooting Guide
Balls Fall Apart
Problem: Rice krispie balls don't hold together properly
Solution: Add more melted chocolate to bind the mixture, or let the chocolate cool slightly before shaping so it's thicker.
Chocolate Too Thick
Problem: Melted chocolate is difficult to mix with cereal
Solution: Add an extra tablespoon of coconut oil or warm the mixture gently in 10-second microwave bursts while stirring.
Uneven Coating
Problem: Some cereal pieces aren't coated with chocolate
Prevention: Stir more thoroughly and ensure chocolate is fully melted. Add chocolate if mixture seems too dry.
Too Sweet
Problem: Finished balls taste overly sweet
Recovery: Add a larger pinch of salt to the chocolate mixture, or use semi-sweet instead of milk chocolate next time.
Won't Set Properly
Problem: Balls remain soft even after chilling
Prevention: Ensure adequate chilling time (at least 15 minutes), or place in freezer for 5-10 minutes for faster setting.
Flavor Balance Issues
Too Sweet: Add a pinch of sea salt or use darker chocolate
Too Salty: Balance with a drizzle of honey or increase vanilla extract
Bland: Add vanilla extract, almond extract, or flavored chocolate chips
Selecting Quality Ingredients
The foundation of exceptional chocolate rice krispie balls lies in using high-quality chocolate chips. Choose semi-sweet or dark chocolate for the best balance of sweetness and rich chocolate flavor. The chocolate-to-cereal ratio is crucial for both taste and structural integrity.
Fresh Rice Krispies cereal ensures maximum crunch and prevents the balls from becoming stale quickly. Avoid using cereal that's been open for extended periods, as it may have lost its crispiness and could affect the final texture.
Essential Ingredient Notes
- Chocolate Quality: Use good-quality chocolate chips rather than candy melts for better flavor. Semi-sweet provides the perfect balance for most palates.
- Coconut Oil Benefits: Coconut oil creates a smoother chocolate coating and helps the balls set properly. It also adds a subtle flavor that complements the chocolate.
- Cereal Freshness: Always use fresh Rice Krispies from a recently opened box. Stale cereal will compromise both texture and flavor.
Mastering the Technique
The secret to professional-looking chocolate rice krispie balls is consistency in size and shape. Using a small ice cream scoop ensures uniformity, while working quickly prevents the chocolate from setting before you've shaped all the balls.
Temperature management is crucial throughout the process. The chocolate should be just warm enough to remain workable but cool enough that it doesn't melt the cereal or make the mixture too sticky to handle effectively.
Perfect Shaping Method
Scoop the mixture, then roll gently between your palms to create perfectly round balls. Work in batches and chill your hands periodically for best results.
Chocolate Rice Krispie Balls Arranged
📋 Ingredients
For the Base
- 340g semi-sweet chocolate chipsHigh-quality chocolate for best flavor
- 30g coconut oilCreates smooth, workable chocolate
- 3 tbsp honeyAdds sweetness and helps binding
- 1 tsp vanilla extractEnhances chocolate flavor
- Optional toppingsNuts, sprinkles, coconut for decoration
- Parchment paperFor easy removal and presentation
- Mini cupcake linersOptional for elegant presentation
For Coating & Decoration
- 6 cups Rice Krispies cerealFresh cereal for maximum crunch
- Pinch of saltEnhances chocolate flavor
Instructions
Prepare Workspace
Line a large baking sheet with parchment paper. If using cupcake liners, arrange 24 mini liners on the sheet. Set aside a small ice cream scoop or spoon for shaping.
Melt Chocolate
In a microwave-safe bowl, combine chocolate chips and coconut oil. Microwave in 30-second intervals, stirring between each, until smooth and fully melted. Stir in honey and vanilla extract.
Mix Cereal
Add Rice Krispies cereal to the melted chocolate mixture. Stir gently but thoroughly until all cereal is evenly coated with chocolate. Add a pinch of salt.
Shape Balls
Using a small ice cream scoop or your hands, form the mixture into 24 uniform balls, about 1.5 inches in diameter. Place each ball in a cupcake liner or directly on parchment paper.
Arrange and Chill
Arrange the balls in neat rows or decorative patterns on the baking sheet. Sprinkle with optional toppings while chocolate is still soft. Refrigerate for 15-20 minutes until set.
Recipe Notes & Tips
Storage
Store in an airtight container at room temperature for up to 1 week. For longer storage, refrigerate for up to 2 weeks or freeze for up to 3 months.
Presentation Ideas
Arrange on tiered serving stands for height variation, or create patterns like concentric circles for elegant party presentations. Mini cupcake liners add a professional touch.
Flavor Variations
Try white chocolate, add peppermint extract for holiday versions, or roll in chopped nuts or coconut for different textures and flavors.