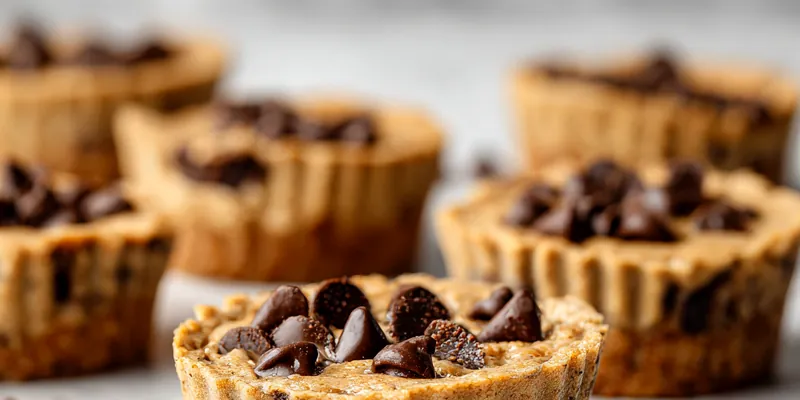
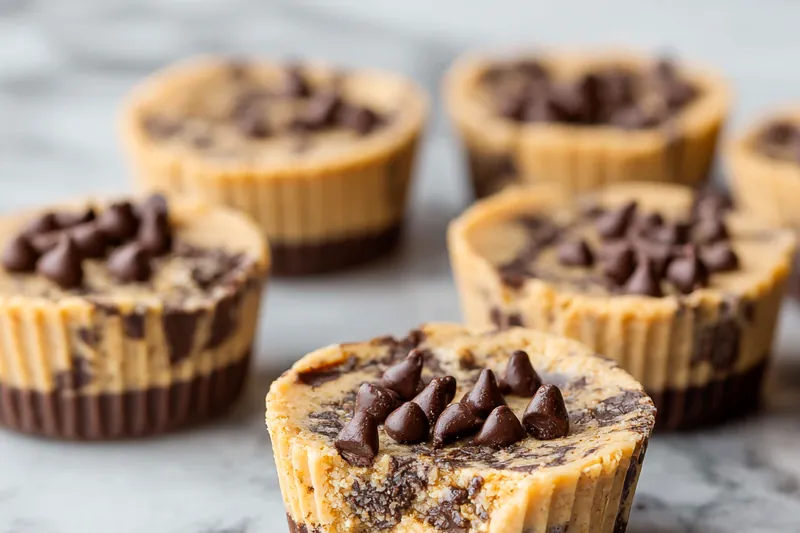
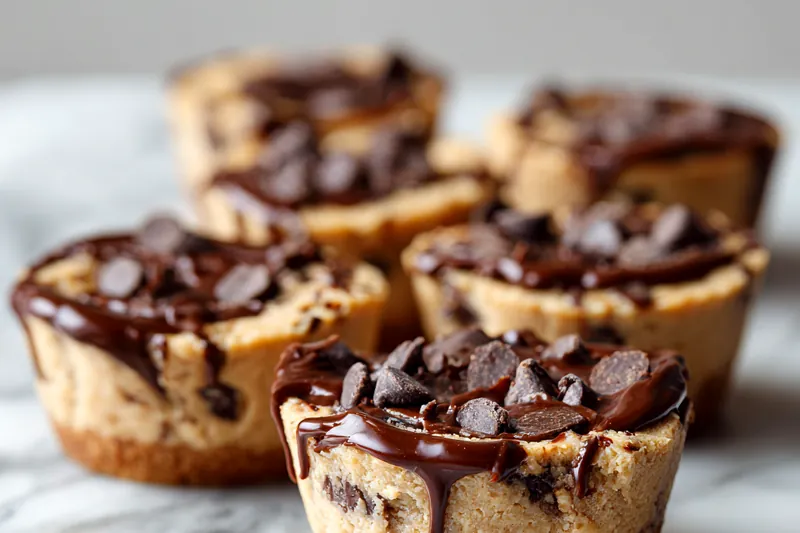
No Bake Chocolate Chip Cookie Dough Cups - Egg-Free Delight
These No Bake Chocolate Chip Cookie Dough Cups are a delightful treat for cookie lovers. They are egg-free, making them safe to eat straight from the bowl. With a creamy texture and rich chocolate flavor, these cookie cups are perfect for satisfying your sweet tooth.

Why This No Bake Chocolate Chip Cookie Dough Cups Recipe Works
This recipe stands out because it requires no baking, making it easy and quick to prepare. The use of softened butter ensures a creamy texture that mimics traditional cookie dough. Plus, it's egg-free, catering to those with dietary restrictions.
The balance of brown and granulated sugar adds depth to the flavor while the mini chocolate chips provide delightful bursts of sweetness. The melted chocolate coating complements the cookie dough, making each bite rich and satisfying.
💡 Professional Tip
For an extra twist, try adding different types of chips, such as white chocolate or peanut butter chips. You can also mix in nuts or dried fruit for added texture and flavor. Just remember to adjust the sweetness to maintain balance.
Frequently Asked Questions
Absolutely! You can prepare these cookie dough cups a day in advance. Just store them in an airtight container in the refrigerator until you're ready to serve.
You can use almond flour or oat flour as a gluten-free alternative. Just make sure to adjust the quantity slightly, as these flours may absorb moisture differently.
Since this is a no-bake recipe, you can tell it's ready when the chocolate is firm and set after refrigeration. The cookie dough should also be firm to the touch but still soft inside.
Yes, these cookie dough cups can be frozen! Just place them in a freezer-safe container, and they will last for up to 2 months. Let them thaw in the refrigerator before serving.
You will need mixing bowls, a spoon for mixing, a cookie scoop or your hands for shaping, and a microwave-safe bowl for melting the chocolate. Muffin liners will also help shape the cups.
These cookie dough cups are perfect on their own, but you can serve them with a scoop of vanilla ice cream for an indulgent dessert. Pair them with a glass of milk or a cup of coffee for a delightful treat.
This recipe doesn't include spices, but you can add a pinch of cinnamon or vanilla extract to enhance the flavor profile. Experimenting with different flavor extracts like almond or hazelnut can also provide a unique twist.
Store any leftovers in an airtight container in the refrigerator. They will stay fresh for up to a week, but they're so delicious, they might not last that long!
Recipe Troubleshooting Guide
Too Dry
Problem: If your dough is too dry, it may lack moisture from the butter or have too much flour.
Solution: Add a little more softened butter or a splash of milk to bring it together. Mix until you reach the desired consistency.
Uneven Coating
Problem: If the chocolate coating is uneven, it might be due to not melting the chocolate properly.
Solution: Make sure to melt the chocolate in short intervals, stirring frequently for a smooth consistency. Use a spoon to ensure even coverage.
Lacking Flavor
Problem: If your cookie cups taste bland, it might be due to insufficient sweeteners or flavorings.
Prevention: Adjust the sweetness by adding more sugar or chocolate chips. Consider incorporating a pinch of salt to enhance the overall flavor.
Wrong Texture
Problem: Your cookie dough cups may turn out too crumbly or too sticky.
Recovery: If too crumbly, add a bit more butter. If too sticky, mix in a little more flour until the texture is just right.
Overcooked
Problem: Overcooking isn't an issue with no-bake recipes, but melted chocolate can burn if not monitored.
Prevention: Always heat chocolate in short intervals, and stir often to prevent burning or seizing up.
Flavor Balance
Too Sweet: If too sweet, you can add a pinch of salt to cut through the sweetness.
Too Salty: If too salty, balance it with a bit more sugar or chocolate.
Bland: For bland flavors, incorporate vanilla extract or a touch of espresso powder for depth.
Choosing the Best Ingredients
For the best flavor, use high-quality butter and fresh ingredients. The type of chocolate chips you choose can significantly affect the sweetness and richness of the cookie cups. Opt for semi-sweet or dark chocolate for a more balanced flavor profile.
When selecting all-purpose flour, ensure it's fresh and has not been sitting open for long. For the sugars, organic brown sugar can impart a deeper flavor, while granulated sugar provides the necessary sweetness.
Essential Ingredient Notes
- Butter: Use unsalted, high-quality butter for the best flavor. Make sure it's softened for easy mixing.
- Chocolate Chips: Choose mini chocolate chips for better distribution throughout the dough. Semi-sweet is a great choice for balanced sweetness.
- All-Purpose Flour: Ensure your flour is fresh to avoid any stale flavors. Sifting can help achieve a lighter texture in the cookie dough.
Cooking Technique Tips
The key to perfect no-bake cookie dough cups is ensuring your butter is adequately softened. This will help create a creamy and easy-to-mix dough. Always be cautious when melting chocolate to prevent burning.
After combining the ingredients, allow the dough to chill slightly before shaping it to prevent sticking. This is crucial for getting the right texture and making the cups easy to handle.
Chef's Secret Technique
To achieve a glossy chocolate finish, temper the chocolate before coating. This involves melting two-thirds of the chocolate, then adding the remaining chocolate to cool it down, creating a perfectly smooth and shiny coating.
No Bake Chocolate Chip Cookie Dough Cups - Egg-Free Delight
📋 Ingredients
For the Cookie Dough:
- 1 cup chocolate chips (for coating)💡 Use semi-sweet or dark chocolate.
For the Coating:
- 1 cup all-purpose flour💡 Make sure it's fresh!
- 1/2 cup unsalted butter, softened💡 Softened for easy mixing.
- 3/4 cup brown sugar, packed💡 Use light or dark brown sugar.
- 1/4 cup granulated sugar💡 Adjust based on sweetness preference.
- 1 teaspoon vanilla extract💡 Pure vanilla gives the best flavor.
Instructions
Step 1: Cream the Butter and Sugars
In a mixing bowl, cream together the softened butter, brown sugar, and granulated sugar until smooth and fluffy.
Step 2: Mix in Vanilla and Salt
Add in the vanilla extract and salt, mixing well until fully incorporated.
Step 3: Incorporate the Flour
Gradually fold in the all-purpose flour until just combined, making sure not to overmix.
Step 4: Add Chocolate Chips
Gently stir in the mini chocolate chips to the dough until evenly distributed.
Step 5: Form Dough Balls
Using a cookie scoop or your hands, form small balls of the cookie dough and place them in muffin liners.
Step 6: Melt the Chocolate
Melt the chocolate chips in a microwave-safe bowl in 20-second intervals, stirring until smooth.
Step 7: Coat the Cups
Spoon the melted chocolate over each dough ball, covering them completely and smoothing it out.
Step 8: Chill and Serve
Refrigerate the cookie dough cups for at least 30 minutes to set before serving.
Recipe Notes & Tips
Storage
Store any leftovers in an airtight container in the refrigerator. They will stay fresh for up to a week.
Serving Suggestions
These cookie dough cups are perfect for a sweet snack or dessert. You can also serve them with a scoop of ice cream for an indulgent treat.
Variations
Feel free to experiment with different types of chips like white chocolate or butterscotch. You can also add chopped nuts for a textural contrast.