Chocolate Chip Brownie Swirl Cookies (Brookies)
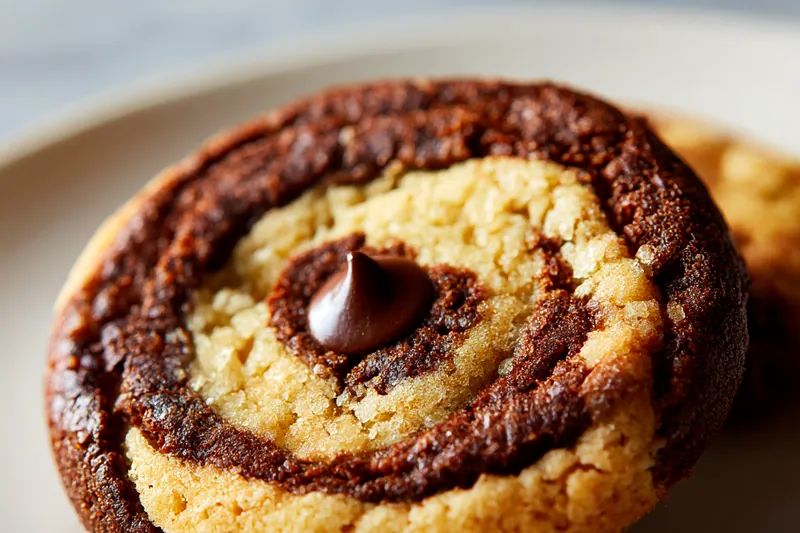
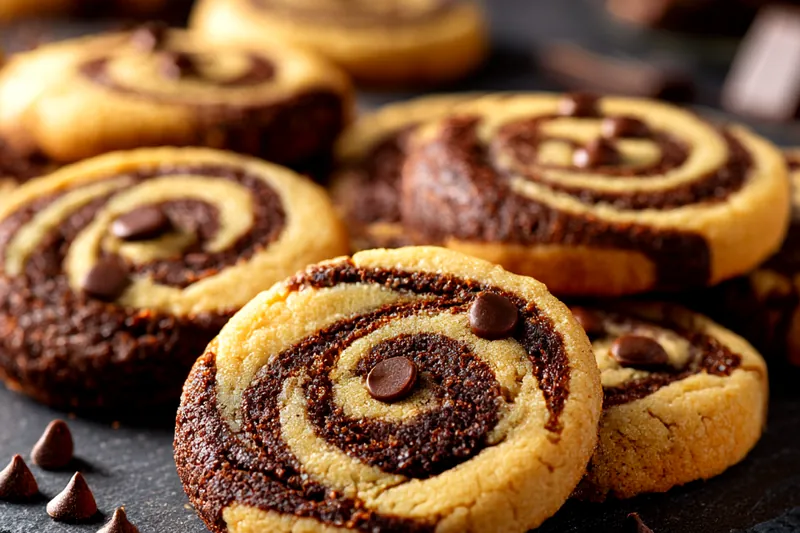
Why choose between chocolate chip cookies and brownies when you can have both? These Chocolate Chip Brownie Swirl Cookies (affectionately called Brookies) combine the best of both worlds in one stunning dessert. Each cookie features a mesmerizing spiral of chewy cookie dough and rich, fudgy brownie batter that looks as impressive as it tastes. They're surprisingly easy to make and guaranteed to be the star of any cookie platter.

The Science Behind Perfect Brookies
The magic of Brookies lies in the careful balance of two distinct doughs that bake at the same rate. The cookie dough provides structure and that classic chewy texture we love, while the brownie portion adds richness and fudgy decadence. The key is ensuring both portions have similar moisture content and fat ratios so they bake evenly together without one overpowering the other. By dividing a single base dough and enriching half with cocoa and cream, we maintain this perfect balance.
Temperature control is crucial for achieving the signature swirl pattern. Chilling the rolled dough log firms up the butter, preventing the layers from bleeding into each other during baking. This also prevents excessive spreading, ensuring your cookies maintain their beautiful spiral appearance. The slight underbaking technique creates the ideal texture contrast - crispy edges from the cookie portion and a soft, fudgy center from the brownie layer. As the cookies cool, they continue to set, reaching the perfect texture without becoming dry or cakey.
💡 Professional Tip
For the most dramatic swirl effect, use a Dutch-processed cocoa powder which is darker in color than natural cocoa. The deeper the color contrast between your cookie and brownie layers, the more stunning your final cookies will look.
Frequently Asked Questions
Absolutely! The cookie dough log can be prepared and refrigerated for up to 3 days or frozen for up to 3 months. If freezing, wrap tightly in plastic wrap and then aluminum foil. When ready to bake, slice frozen dough directly (no need to thaw) and add 1-2 extra minutes to the baking time. You can also freeze baked cookies for up to 2 months - thaw at room temperature for about 30 minutes before serving.
Yes, with some adjustments. For a gluten-free version, use a 1:1 gluten-free flour blend designed for baking (ones with xanthan gum work best). For dairy-free, substitute the butter with vegan butter sticks (not spreads) and use full-fat coconut cream instead of heavy cream. The texture will be slightly different but still delicious. Note that sugar substitutes may affect the texture and spreading, so I recommend sticking with regular sugars for best results.
Excessive spreading is usually caused by dough that's too warm or butter that's too soft. Make sure your butter is softened to room temperature, not melted or greasy. The dough log must be thoroughly chilled (at least 1 hour, preferably 2) before slicing. If your kitchen is very warm, chill the sliced cookies on the baking sheet for 10 minutes before baking. Also ensure you're measuring flour correctly - spoon it into the measuring cup and level off rather than scooping directly from the bag, which packs in too much flour.
Yes! Dark chocolate chips work wonderfully and add a more sophisticated, less sweet flavor profile. You can also mix chip varieties - try a combination of semi-sweet, dark, and milk chocolate for a complex chocolate experience. White chocolate chips can be added for visual contrast, though they may make the cookies slightly sweeter. For an extra special touch, use chopped chocolate bars instead of chips for those gorgeous chocolate puddles.
Brookies should look slightly underdone when you remove them from the oven. The edges will be set and lightly golden, but the centers should still look soft and possibly even a bit shiny. They'll appear puffed up and may have small cracks forming. A gentle touch to the edge should feel firm, but the center should give slightly. Remember, they continue baking on the hot pan after removal and will firm up as they cool. If you wait until they look fully done in the oven, they'll be overdone once cooled.
These Brookies are incredible on their own, but they're absolutely divine when served warm with a scoop of vanilla ice cream - the heat melts the ice cream into the swirls beautifully. They also pair wonderfully with cold milk, hot coffee, or even a glass of dessert wine like Port. For a party presentation, create a cookie board with these as the centerpiece, surrounded by fresh berries, whipped cream, and chocolate sauce for dipping. They're also perfect for making ice cream sandwiches!
Definitely! Feel free to customize your Brookies with your favorite add-ins. Chopped nuts (walnuts, pecans, or hazelnuts) add great texture and can be mixed into either or both doughs. Peanut butter chips, butterscotch chips, or caramel bits work beautifully. For a mint version, add 1/2 teaspoon peppermint extract to the brownie portion and use mint chocolate chips. Just keep total mix-ins to about 2 cups so the cookies don't become too heavy. You can also sprinkle sea salt on top before baking for a sweet-salty contrast.
Store cooled Brookies in an airtight container at room temperature for up to 5 days. Layer them with parchment paper to prevent sticking. For longer storage, freeze cookies in a freezer-safe container or bag for up to 3 months. To maintain the best texture, place a piece of bread in the container - it will release moisture that keeps the cookies soft without making them soggy (replace the bread every 2 days). If they do become slightly stale, warm individual cookies in the microwave for 8-10 seconds to refresh them.
Recipe Troubleshooting Guide
Swirls Bleeding Together
Problem: The cookie and brownie layers are mixing together and losing their distinct spiral pattern during baking.
Solution: This happens when the dough isn't chilled long enough before baking. Freeze the dough log for 30 minutes before slicing, or refrigerate sliced cookies for 10-15 minutes on the baking sheet before baking. Also ensure your oven temperature is accurate - an oven that's too hot can cause rapid spreading. Use an oven thermometer to verify the temperature.
Cookies Too Cakey
Problem: The cookies are rising too much and have a cake-like texture instead of being chewy and fudgy.
Solution: You may be overmixing the dough or using too much flour. Mix just until ingredients are combined, and check your flour measurement - use the spoon-and-level method. Also, make sure you're not overbaking. Cookies should be removed when centers still look slightly underdone. Finally, try using more brown sugar than white sugar (reverse the ratio to 1 cup brown, 1/2 cup white) for chewier results.
Dough Too Difficult to Roll
Problem: The dough is cracking or breaking apart when trying to roll it into a log.
Prevention: The dough may be too cold or dry. Let it sit at room temperature for 5-10 minutes to become more pliable. When spreading the dough initially, ensure it's even thickness throughout. Use the parchment paper to help guide the roll - lift one edge and let the dough fold over itself, then continue rolling tightly. If the brownie layer is too thick, it can cause cracking; aim for an even, thin layer of each dough type.
Centers Are Raw
Problem: The edges are perfect but the centers are underbaked or gooey in a bad way.
Recovery: Your cookies may be too thick - slice them to exactly 1/2 inch thick for even baking. Also check that your oven temperature is accurate; if too hot, edges cook too fast before centers are done. Try baking at 325°F instead of 350°F for 13-15 minutes for more even baking. Space cookies at least 2 inches apart on the baking sheet to allow proper heat circulation. Using light-colored baking sheets instead of dark ones can also help prevent the bottoms from overcooking before centers are done.
Cookies Too Hard or Crispy
Problem: The cookies are turning out hard and crispy throughout instead of having soft centers.
Prevention: You're likely overbaking them. Remember, these cookies should look underdone when removed from the oven. Set your timer for 11 minutes and check - they should be just barely golden at the edges. Also ensure you're measuring flour correctly and not adding too much. Check that your butter was properly softened (not melted) and that you're using fresh baking soda. Store cookies properly in an airtight container with a slice of bread to maintain softness.
Flavor Balance Issues
Too Sweet: If too sweet, reduce granulated sugar to 1/2 cup and increase salt to 1 1/4 teaspoons. Use dark chocolate chips instead of semi-sweet, or add 1/4 teaspoon espresso powder to the brownie portion to balance sweetness.
Too Salty: If too salty, reduce salt to 3/4 teaspoon total. Check that you're using unsalted butter - if using salted, reduce added salt by half. Make sure you're measuring salt level, not heaping.
Bland: If bland, increase vanilla to 1 tablespoon, add 1/2 teaspoon espresso powder to brownie portion to enhance chocolate flavor, and ensure brown sugar is fresh (old brown sugar loses flavor). A pinch of cinnamon in the cookie dough can also add depth.
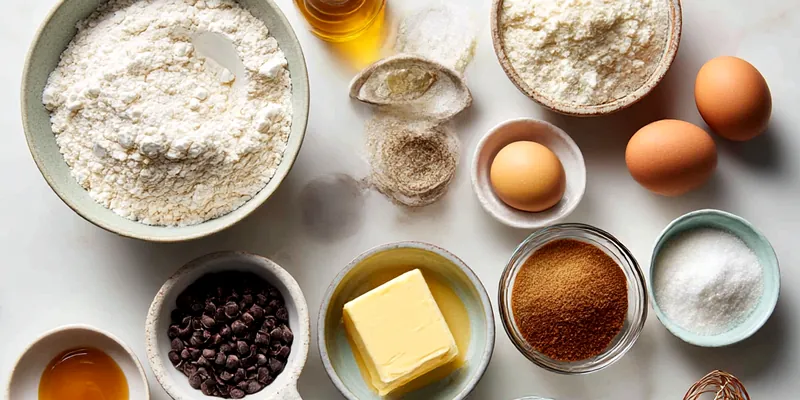
Selecting the Best Ingredients for Ultimate Brookies
The quality of your ingredients directly impacts the flavor and texture of your Brookies. Start with real butter - never margarine or spreads. Butter should be softened to about 65-68°F, which means it should give when pressed but still hold its shape. For the sugars, using both granulated and brown sugar creates the perfect texture: granulated sugar provides crispiness and structure, while brown sugar adds moisture and that irresistible chewy quality. Fresh brown sugar is key - if yours has hardened, it's lost moisture and won't perform properly.
Chocolate quality matters significantly in this recipe since chocolate is a star ingredient. Choose chocolate chips or chunks with at least 60% cacao for the best flavor. The cocoa powder should be unsweetened and preferably Dutch-processed for a deeper, less acidic chocolate flavor in the brownie portion. Using room-temperature eggs helps them incorporate smoothly into the butter mixture, creating a more stable emulsion. Finally, real vanilla extract (not imitation) provides depth that complements both the cookie and brownie elements. These small quality choices add up to create an extraordinary cookie that tastes like it came from a high-end bakery.
Essential Ingredient Notes
- Unsalted Butter: Use high-quality unsalted butter softened to room temperature (about 65°F). It should be soft enough to leave an indent when pressed but not greasy or melted. European-style butter with higher fat content will create even richer cookies. If you only have salted butter, reduce the added salt to 1/2 teaspoon.
- Dutch-Processed Cocoa Powder: Dutch-processed cocoa creates a darker color and smoother, less acidic flavor than natural cocoa. Brands like Valrhona or Guittard work beautifully. If using natural cocoa, add 1/8 teaspoon baking soda to the brownie portion to balance acidity. Sift cocoa powder before using to prevent lumps in your brownie layer.
- Quality Chocolate Chips: Use real chocolate chips, not candy-coated or artificially flavored chips. Ghirardelli, Guittard, or Callebaut semi-sweet chips have excellent flavor and melt beautifully. For the brownie portion, mini chocolate chips distribute more evenly through the dough. You can also chop a chocolate bar into chunks for those gorgeous melty chocolate pools.
Mastering the Swirl Technique
The signature swirl is what makes Brookies so visually stunning, and achieving it requires just a bit of technique. The key is creating two dough layers of similar thickness and consistency. When spreading your cookie dough into a rectangle, aim for uniformity - use a ruler if needed! The brownie portion should be slightly softer and stickier than traditional cookie dough due to the cocoa and cream, but it should still be spreadable without being runny. If it's too soft, refrigerate for 10 minutes before spreading over the cookie layer.
Rolling the dough tightly is essential for defined swirls. Use the parchment paper as a guide - lift the edge closest to you and fold it over, then continue rolling away from yourself while maintaining even pressure. The roll should be snug but not so tight that it squeezes out the filling. Chilling is not optional here; it's what sets the butter and allows for clean slicing. When cutting your cookies, use a sharp knife and wipe it clean between each slice. A sawing motion works better than pressing straight down, which can compress and distort your beautiful spirals. If you notice the dough getting soft while slicing, return it to the refrigerator for 15 minutes.
The Perfect Roll and Chill
The secret to professional-looking swirl cookies lies in proper rolling and chilling. After layering your doughs, start rolling from the long edge, using the parchment paper to lift and guide the dough. Roll tightly enough to eliminate air pockets but not so tight that the filling oozes out. Once rolled, wrap the log tightly in plastic wrap, twisting the ends like a candy wrapper. Refrigerate for at least 1 hour, or up to 24 hours for the firmest cuts. For the cleanest slices, use a sharp chef's knife and wipe it clean between each cut. If the dough starts to soften while slicing, return it to the refrigerator. This patience pays off with cookies that maintain their stunning swirl pattern through baking and cooling.
Chocolate Chip Brownie Swirl Cookies (Brookies)
📋 Ingredients
Cookie Dough Base
- 1/3 cup (40g) unsweetened cocoa powderDutch-processed cocoa creates deeper color and less acidic flavor
- 1/4 cup (60ml) heavy creamAdds richness and helps bind the brownie portion
- 1/2 teaspoon espresso powder (optional)Enhances chocolate flavor without adding coffee taste
- 1/2 cup (85g) semi-sweet chocolate chipsFor the brownie portion - use mini chips for even distribution
Brownie Enhancement
- 1 cup (226g) unsalted butter, softenedShould be room temperature, about 65°F, soft but not greasy
- 3/4 cup (150g) granulated sugarCreates structure and crispy edges
- 3/4 cup (165g) packed light brown sugarAdds moisture and chewy texture - pack it firmly when measuring
- 2 large eggs, room temperatureRoom temperature eggs incorporate better - set out 30 minutes ahead
- 2 teaspoons vanilla extractUse pure vanilla extract, not imitation, for best flavor
- 2 1/4 cups (281g) all-purpose flourSpoon into measuring cup and level off - don't pack or scoop
- 1 teaspoon baking sodaHelps cookies spread and creates tender texture
- 1 teaspoon saltEnhances flavors and balances sweetness
- 1 cup (170g) semi-sweet chocolate chipsFor the cookie portion - reserve a few for topping centers
Instructions
Prepare Cookie Dough Base
In a large bowl, cream together softened butter, granulated sugar, and brown sugar using an electric mixer on medium speed until light and fluffy (about 3 minutes). The mixture should be pale and increased in volume. Beat in eggs one at a time, mixing well after each addition, then add vanilla extract. In a separate bowl, whisk together flour, baking soda, and salt. Gradually add the dry ingredients to the wet ingredients, mixing on low speed until just combined - don't overmix or cookies will be tough.
Divide and Create Brownie Portion
Remove 1 1/2 cups of the prepared cookie dough and place it in a separate medium bowl. To this portion, add the cocoa powder, heavy cream, espresso powder (if using), and 1/2 cup chocolate chips. Mix with a spatula until fully combined and uniform in rich chocolate color - there should be no streaks of plain dough remaining. To the remaining cookie dough in the large bowl, fold in 1 cup of chocolate chips until evenly distributed. You now have your two distinct doughs ready.
Create Swirl Pattern
Place a large piece of parchment paper on your work surface. Transfer the cookie dough onto the parchment and, using your hands or a rolling pin, press and shape it into a 12x8 inch rectangle approximately 1/4 inch thick. Spread the brownie dough evenly over the top of the cookie dough layer, leaving a 1/2-inch border on one long edge. Starting from the opposite long side (without the border), use the parchment paper to help you tightly roll the dough into a log shape, jelly-roll style. Pinch the seam to seal. Wrap the log tightly in plastic wrap, twisting the ends, and refrigerate for at least 1 hour or up to 24 hours until very firm.
Slice and Bake
Preheat oven to 350°F (175°C) and position racks in the upper and lower thirds. Line two baking sheets with parchment paper. Unwrap the chilled dough log and, using a sharp knife, slice into 1/2-inch thick rounds, wiping the knife clean between cuts for the cleanest spirals. Place cookies 2 inches apart on prepared baking sheets - they will spread during baking. If desired, press an additional chocolate chip into the center of each cookie for presentation. Bake for 11-13 minutes, rotating pans halfway through, until edges are set and lightly golden but centers still look soft and slightly underdone.
Cool and Serve
Remove baking sheets from oven and let cookies cool on the pan for 5 minutes - this is crucial as they'll continue to set during this time. The cookies may look too soft, but they'll firm up as they cool. After 5 minutes, carefully transfer cookies to a wire cooling rack using a thin spatula. Allow to cool completely before serving, or enjoy them slightly warm for maximum fudginess. Store cooled cookies in an airtight container at room temperature for up to 5 days. For best texture, place a slice of bread in the container to maintain moisture.
Recipe Notes & Tips
Storage
Store cooled Brookies in an airtight container at room temperature for up to 5 days, layering with parchment paper to prevent sticking. Add a slice of bread to the container to keep cookies soft. The unbaked dough log can be refrigerated for up to 3 days or frozen for up to 3 months (slice and bake directly from frozen, adding 1-2 minutes to bake time). Baked cookies freeze beautifully for up to 3 months - thaw at room temperature for 30 minutes before serving.
Serving Suggestions
Serve these Brookies warm with vanilla ice cream for an ultimate dessert experience - the heat melts the ice cream into the swirls beautifully. They're perfect with cold milk, coffee, or hot chocolate. For parties, create a cookie board with Brookies as the centerpiece, surrounded by fresh berries, whipped cream, chocolate sauce, and caramel. They also make incredible ice cream sandwiches - use softened ice cream between two cookies and refreeze for 2 hours before serving.
Variations
Create different flavor profiles by adding 1/2 teaspoon peppermint extract to the brownie portion and using mint chocolate chips for a mint brookie. Try adding 1/2 cup chopped nuts (walnuts, pecans, or hazelnuts) to either or both doughs. For peanut butter lovers, swirl in 2 tablespoons of creamy peanut butter into the brownie portion before rolling. White chocolate chips can replace some of the semi-sweet chips for color contrast. For salted caramel brookies, add caramel bits to the cookie dough and sprinkle flaky sea salt on top before baking.